


Wow looks very good! I want pistons with that compression height too. What is the height?

Wow looks very good! I want pistons with that compression height too. What is the height?
25mm
thats what the chap who will bore the block for me saidOriginally Posted by Tristan

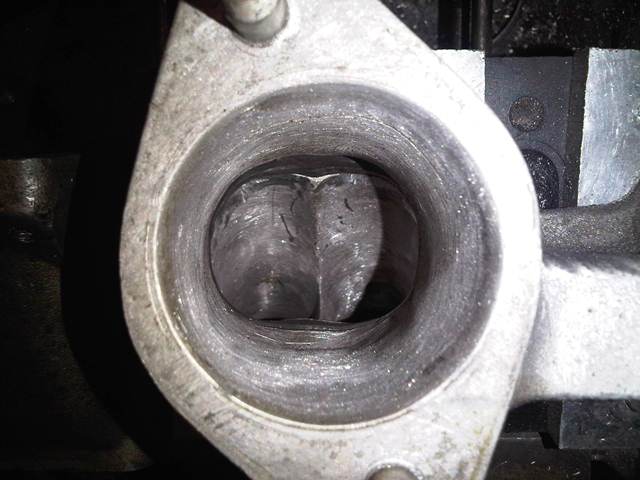
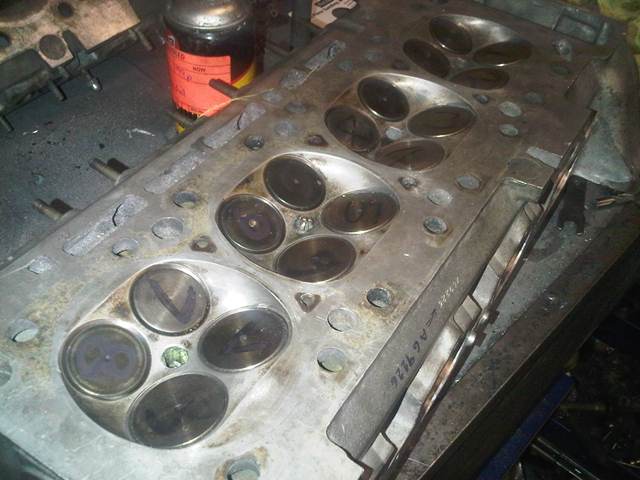
another 5hours of grinding and im almost there the portings done, i just need to do some detailed work on the short side, boy am i sick of grinding aluminium, so much so im really looking forward to grinding a pinto head LOL! as per usual on teh last port i broke through, fortunatly this time only into the end on a manifold stud hole so its of no consiquence.
i've also made a start on the inlet adapter plate transferring the manifold and head shapes to a polycarb off cut,to use as a template, i can feel plenty more hours grinding coming on!!!
Last edited by Graham; 18-02-2011 at 09:41.
Oh, you don't wanna know what I'm picking up today then. Oh well at least YB heads dont need much porting for N/A
Cant wait to see this head up close next week
Sierra cosworth turbo race car
QMN saloon car championship
RETRO Motorsport
The crank and rods won't be under any strain whatsoever with those pistons! that is a massive weight saving
She'l easily go to 9k now if the valve springs etc will take it
Will be very interested to see how you get on with 1 compression ring, sbd use pistons like that in their full on XE and Duratec engines with 1 compression ring to get more bhp, less friction.
"Horsepower sells cars, torque wins races" - Enzo Ferrari
me to although i doubt i'l be revving it hard enough to fully benifit from a single ring.Will be very interested to see how you get on with 1 compression ring, sbd use pistons like that in their full on XE and Duratec engines with 1 compression ring to get more bhp, less friction.
dunno what revs std valve springs will stand although i suspect they will take anything the 292 inlet can will revto as schrick only recomend there springs rather than saying you have to use them
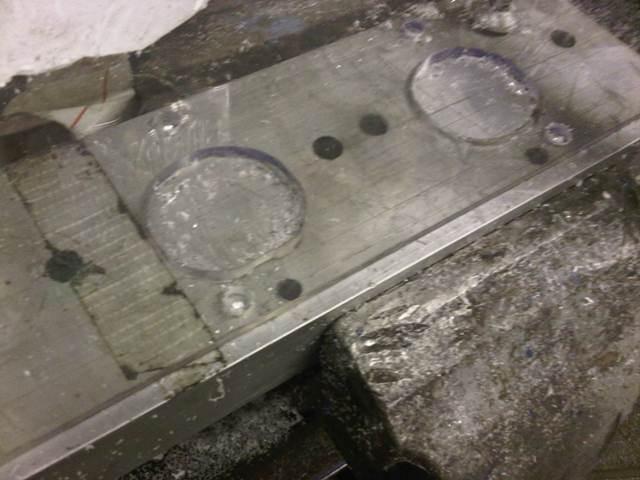
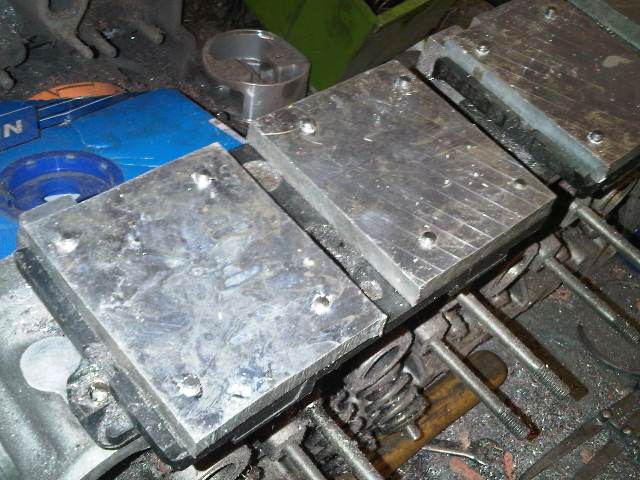
a bit more progress, having started to make an adaptor plate, ive changed my mind, after starting it i found the missing OE inlet manifold rubber mounting thingy that i've spent 6 months looking for, so i abandoned the thick adaptor not really wanting to hang a couple of kgs of alloy on the side of the head anyway, plus with limited space it was really difficult trying to get all the drillings in the right place and leave space to get a gas tight seal
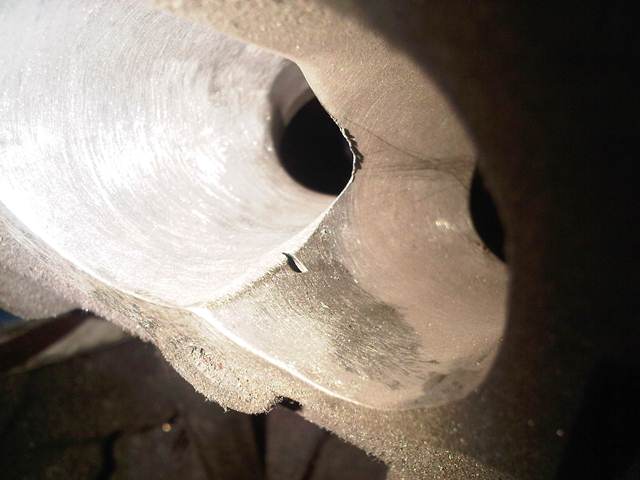
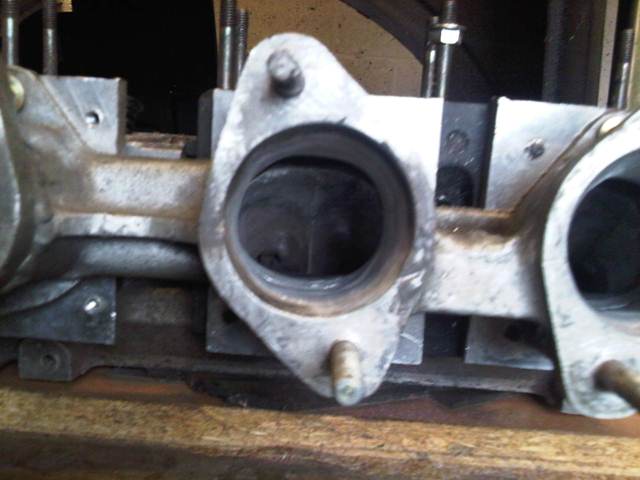
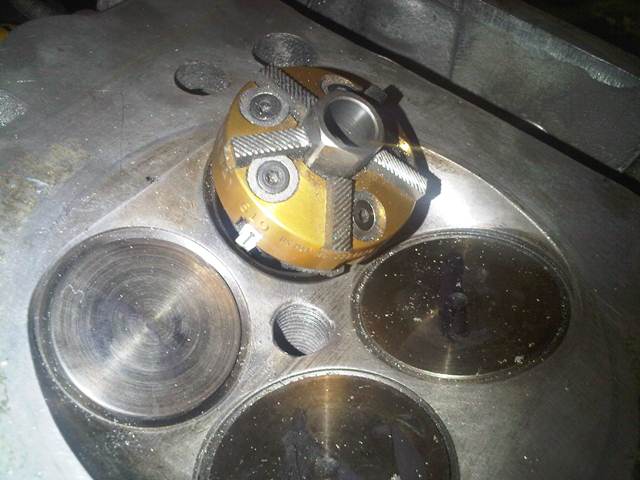
heres one of the OE inlet throttle body mounts which has been opened out to match the ported head on an unported head
so instead made 4 small adaptors to go on the manifold rubbers
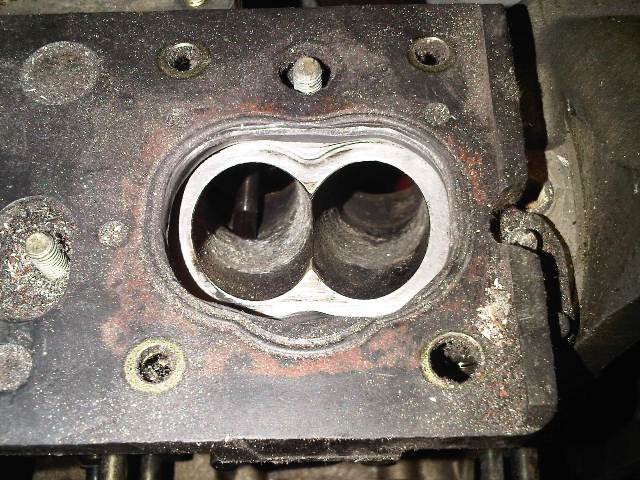
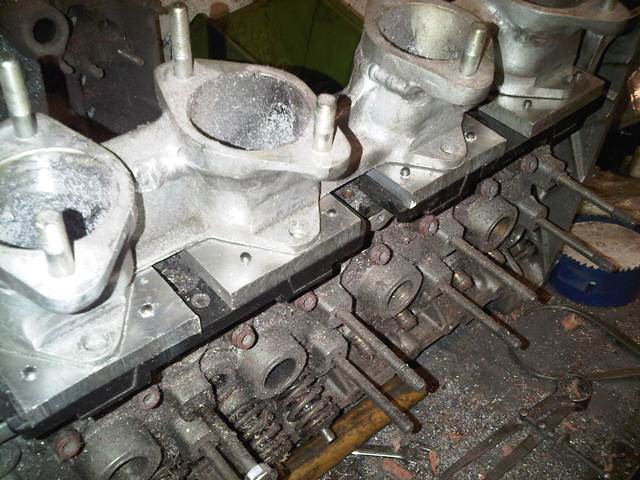
here we are m10 manifold and jenveys on the s14, still got to put the ports in the adapters but due to the m10 having taller but narrower ports i wil probably end up filling in the bottom of the manifold with some jb weld, otherwise im going to end up with a nasty sharp turn in manifolding where it meets the port
is JB weld that good? I've a couple ofspots I could do with building up in my (steel) intake mani , for less turbulence , but was worried about lumps of stuff entering the engine .
Yeah JB weld is good, I used to to build up the port floor on my xflow intake manifold. I must admit I did cheat slightly and fitted some roll pins to give it something to grip!
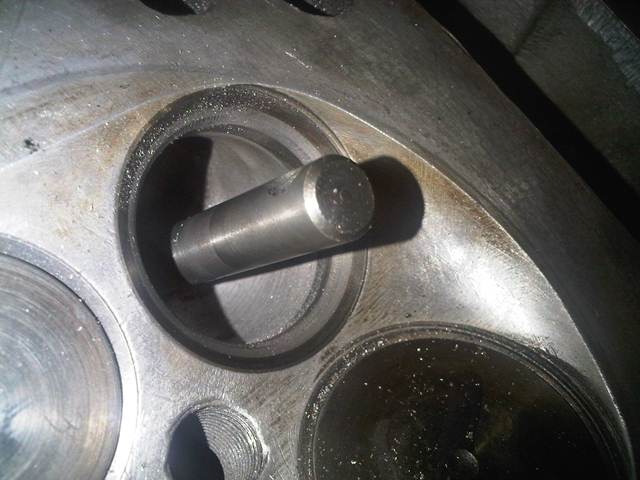
Nice work Graham, that picture of the port adapter versus the standard port really shows how much material you had to remove!
http://escort.accelerator.org
1968 MK1 Escort 1300GT
1969 'Big Wing' MK1 Escort
1972 MK3 Cortina 1600XL
1984 Sierra XR4i
And other junk I don't like to talk about!
for some added security i did have it in mind to drive a couple of small self tappers into the floor of the manifold leaving there heads sticking upYeah JB weld is good, I used to to build up the port floor on my xflow intake manifold. I must admit I did cheat slightly and fitted some roll pins to give it something to grip!
with a steel manifold i would either use braze or solderI could do with building up in my (steel) intake mani
I think JB weld will work fine if you make planty of channels in the alloy manifold, if you are looking for something better then I beleive this would make an excellent port filler for alloy manfiolds and alloy heads, would take a bit of time to warm up a head but it would not weaken the casting in any way and it looks like this stuff bonds really well to the base metal.
Last edited by RWD fords rule; 20-02-2011 at 18:55.
"Horsepower sells cars, torque wins races" - Enzo Ferrari
Looks like a nice product and would produce a very strong filler material.. It requires slightly less than 400 degrees celcius to get it to bond to the base material so should not cause too many problems. If the head or manifold was bolted up to either a head or block then the risk of warpage would not be too great.
To finish first, you must first finish
blimey that looks like good stuff! i can think of lots of uses for it inclueding a bmw head with several holes in it!!!!!!!!!!!!!!
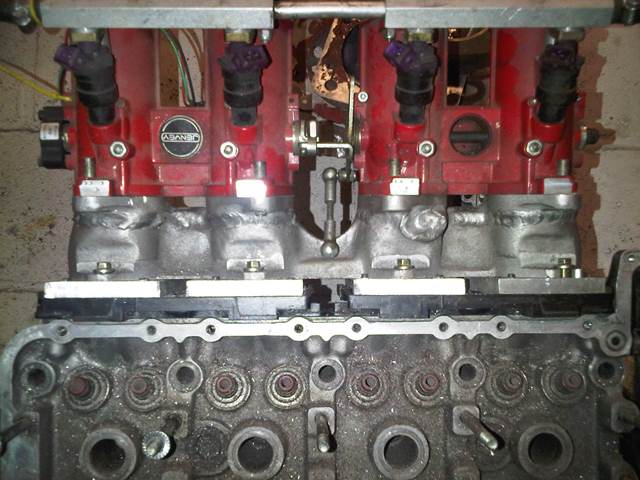
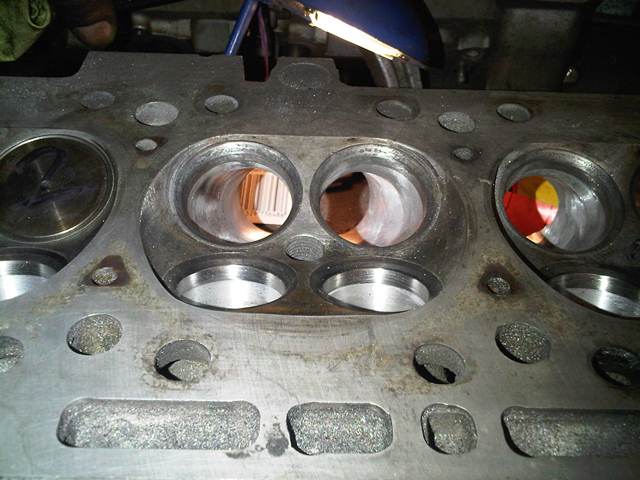
in the end i decided not to fill anything and just blended everything together, not quite finished in this pic but nearly there, having thought about it the std s14 has quite a sharp turn on the short side, which doesnt seem to hurt it, especially when you think the standard road going 2.0 version still pumps out over 190bhp!
the angle of the port means effectively its opening is slash cut so the area of its opening is much bigger than the port itself and as the area of the inlet manifold is greater than the area of the port i dont think it will flow any differently to when it was on the flowbench, only one way to find out...........................
Last edited by Graham; 20-02-2011 at 22:19.
that stuff looks phenomenal, how can we get some of that posted to our doors???????
its not dead till it's buried!
T.I.T engineering. "Feel the power!"
This is a web site. They post internationally. If you go through the shopping cart it adds the postage costs.
http://www.aluminumrepair.com/shoppi...ayproducts.asp
$65.00 for 1lb which is not too bad plus postage.
A few places list it on Ebay also
http://cgi.ebay.com.au/10-pc-18-Alum...item4aa3df6551
Tom
Last edited by Group4_Mark2; 20-02-2011 at 22:37.
To finish first, you must first finish
variations of that have been out years, i have some in by toolbox from RS . i think it was called technoweld ? dave walker has used it in a mag article once might even have beenas far back as in ccc magthe wire brush has to be stainless and the stuff i have needs to be "agitated" with a sharp ss rod on the surface.
It may all be marketing blurb but they claim on the web site to be much better than technoweld. Seemingly it is a much more complicated alloy and does not need the special stainless brush. Would be interesting to see how well it works. How well did technoweld work for you?
To finish first, you must first finish
never needed it
im sure the passage of time will have seen improvements tho so it may well be as easy as shown
i've used technoweld, it does work, just! but in my view its not actually very good
i used this stuff at uni, to put together a tubed frame for my major project, it is very very easy stuff to use, i did most of the work with a normal blowtorch although using a proper oxy lamp is much faster... on a test piece i did i did manage to get the welded bit to crack but it took far more force than i was ever going to use, it is however much harder to grind back than normal alu. i bought it from some school educational place, cant remember what it was called though... i have always wondered though as its melting point is much lower than normal alu would it not just melt if you used it in a cylinder head? would have thought it would be excellent for fixing an inlet if you went through though.
tis going to be an awesome engine for sure. and those pistons are ridiculous, i think the ones in the Ferrari store window display (just up the road from my office) are taller than that
Last edited by Dan; 21-02-2011 at 12:00.
depends where you use it i guess, but its probably like the case of a firebox/boiler on a steam loco, the firebox gets hot enough to melt the steel its made of, the reason it doesnt melt is all the water on the outside of the firebox absorbing the heat
makes perfectly good sense.
its not dead till it's buried!
T.I.T engineering. "Feel the power!"
I would think that you would be in a lot of trouble if your cylinder head was at around 400 degrees celcius anyhow. Melting a bit of weld would be the least of your worries
To finish first, you must first finish
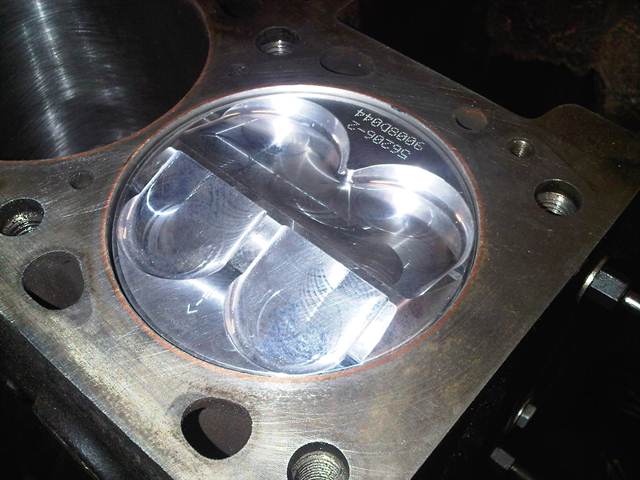
blocks now bored t suit the pistons so the capacity is now 2598.9cc
as you can see instead of being 3mm out the block its as predicted 2mm down the bore, i've had a couple of goes at working out how the piston shape effects the CR, by bureetting the volume above the piston with it a little way down the bore, i've got different results each time, possible because i got a bit of fluid leakage around the piston, will have to try again with rings fitted, eitherway though it seems the intruder volume isnt as great as the valve cutouts so compaired to a flat piston it actually drops the compression a bit, as it stands the C/R is under 10:1, so the blocks gone off again to have 40 thou skimmed off it, using a thin headgasket will take another 40 thou out the volume and should give me around 12.5:1 depending on the exact cc of the head once thats finished, as long as i have between about 12 and 13 to one i'll be happy, with s14 bits being hard to come by at afforadable prices i dont want to skim any more off anything than i really have to
Sounds like you are getting there, hopefully the skim and gasket will get the cr right and you'll be a big step further along.
Sierra cosworth turbo race car
QMN saloon car championship
RETRO Motorsport
It's a good thing you can ditch the decompression plate. What kind of rods are you running?
std length s14 (144mm long as opposed to 149 that the pistons are intended for) steel ones from the land of down under, they recon they are good for 10K, they have been to 8K most laps, so with pistons 20% lighter should be ok for 9 TBH i dont really want to rev it that hard i cant afford to wear it out!
Last edited by Graham; 24-02-2011 at 22:48.
Looking good Graham, how many hours would you have put into the work on the head?
theres a long days worth of grinding in the head, it was taking me about 3 hrs per cylinder although i did need to have a few breaks to let the compressors catch up or the die grinders thaw out, thats grinders plural, constant grinding after a while cause ice to form inside them so they stop working, plus they freeze your hands even wearing gloves
thats the only reason i got an electric diegrinder.
yeah i want one after using dave walkers one, the only downside of them is they are heavy!
Graham, I have just purchased a really good, industial quality die electric grinder, and it is MILES easier and faster to use, much more torque than any air grinder even at low rpm and goes up to 20,000rpm, variable speed foot pedal, proper collets which crush at both ends instead of just one end in an air grinder, they accept 1/4", 6mm, 1/8", 3mm and a smaller size which is handy.
The hand piece is far lighter, about the same weight as a dremel and the head is a small diameter its about 20mm or so, you can get right down into an 8v port with the handpiece.
It uses a flexible drive shaft, I have tried to break the drive shaft digging out cast iron and alloy with carbide burr, it hardly even loads up the 190w motor!
Dremels are about 85w
Here is the motor:
http://www.axminster.co.uk/axminster...nit-prod20091/
And the hand piece, go for the standard size one
http://www.axminster.co.uk/axminster...ets-prod30234/
£107.85 for the lot including vat
The only negative point against it is that the flexible drive shaft could have been made little longer, but it is more than manageable, just mount the motor fairly close to you.
Lets just say I will never be using an air grinder again, they are sh1t compared to this.
I believe I could fully port 2 or maybe 3 heads with this grinder vs. porting one head with a good air grinder.
Its the nuts
Btw have a look here for a very good porting guide, this is where i found hte die grinder, this guy uses the same grinder day in day out for porting heads.
http://uk-mkivs.net/forums/p/362936/2467156.aspx
Last edited by RWD fords rule; 26-02-2011 at 17:36.
"Horsepower sells cars, torque wins races" - Enzo Ferrari

You'l make the money back in no time, with a good grinder like that you might even start a buisness selling full race heads?!?
Would be miles better than the average heads out there
"Horsepower sells cars, torque wins races" - Enzo Ferrari
Thats insanely cheap! Makes my Metabo http://www.powertooldirect.co.uk/met...e-p-76992.html look outrageously expensive! Just to clarify , you get the drive motor , the flexible shaft for, little over a hundred quid?
It's definitely powerful enough?
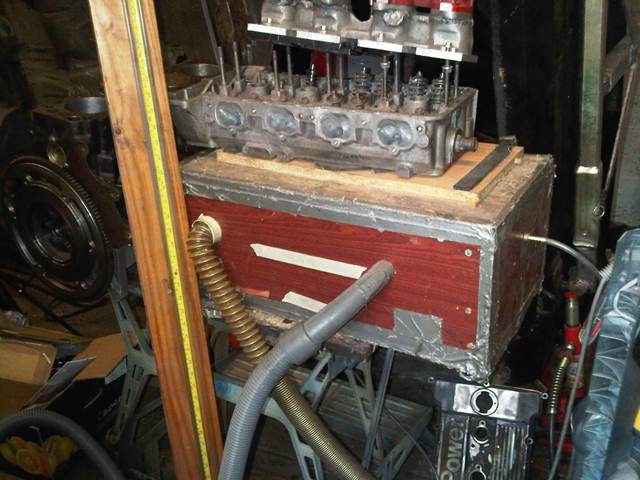
ok i dragged the £24 flow bench out again today, what i wanted to do was see what effect adding the inlet manifold to the head would have on flow, the answer being next to nothing
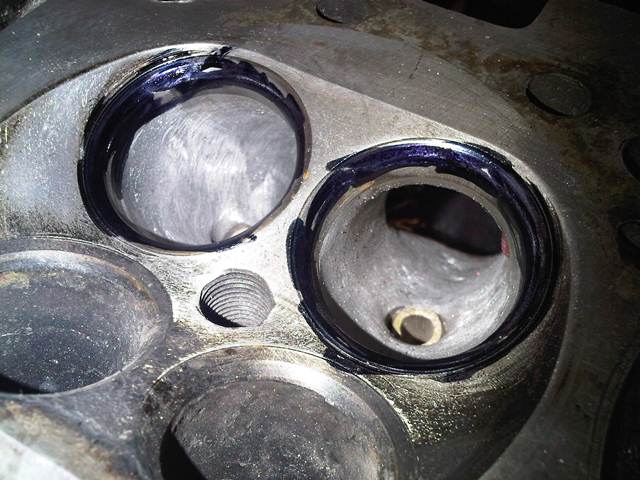
next it was time to finish tickling the valve throats
this head has had the seats recut before i got it, so i just lapped the valves in, turns out though the exhaust seats were very wide and left a sharp corner, so i put a 60 degree cut on them to narrow them, the inlets got a very very light 60 degree cut just to " break " the seat edges and improve low lift flow, worth having as the port shape looses some very low lift flow
TBH the guides are a bit marginal wearwise, and i had to "select" the best valves but the budget really has been blown wide open, especially as i just ordered a couple of new tensioner blades having decided i didnt have any used ones good enough to go again,painfull two blades are £ 420 did i say something about building an s14 being cheaper
It's always the case that you go over budget, no matter what you are doing.
I find once the money is spent, it's forgotten about... until you next go to the bank
You get the motor, the shaft also comes with the motor, and the hand piece is seperate, the lot of £108 inc vat, delivery was about 15 to £20 to southern Ireland, they also sell spare shafts, I got a spare one while i was at it.
I was also thinking 190W might not be enough for rough porting, I was well wrong! this thing is an animal, tbh I would not want to use it at full rpm if it had any more power, with a carbide burr in there it eats through cast iron, and porting alloy is even easier, not kidding you would rough out 2 or 3 heads with this vs using an air grinder to rough out 1 head, they are crap compared to this
"Horsepower sells cars, torque wins races" - Enzo Ferrari
Good to see the old flowbench being used again, I have been flow testing some different intake systems on mine with pinto manifolds, the trumpet makes quite a big difference to flow and the width of the throttle shaft is very important, the thinner the better.
About getting max flow with the throttle slightly shut, some people say engines can make more power when set up to give less than full throttle, it seems having the throttle open just enough to not restrict airflow can give better port velocity in some cases.
That is how fly by wire works, the engine is only ever on full throttle high up in the revs, which gives much better low and mid range power due to better port/intake velocity.
"Horsepower sells cars, torque wins races" - Enzo Ferrari
 Posting Permissions
 Reply With Quote


.jpg)


Bookmarks