User Tag List

+ Reply to Thread
Page 4 of 19 FirstFirst 1 2 3 4 5 6 7 8 9 10 11 12 13 14 15 16 17 18 19 LastLast
Results 121 to 160 of 724

Thread: 1977 Mk2 Zakspeed Escort. Rebuilding my pride and joy.

  1. #121
    Mechanic

    My 1st Project
    Join Date
    Apr 2017
    Location
    Essex
    Age
    53
    Posts
    797
    Thanks
    102
    Thanked 115 Times in 101 Posts

    Re: 1977 Mk2 Zakspeed Escort. Rebuilding my pride and joy.

    As the replacement front chassis rails still aren't available and I don't want to waste any available garage time, I've got on with other things. Loads of options, but I've for with preparing these donor rear quarter sections.
    I got these last year, and other than a quick check over and initial trim they've sat on the shelf.

    IMG_3769.JPG

    Last couple of days I set myself to clean them up, and trim them down to the size I need.

    IMG_3770.JPG

    The RH one is a bit of a "tea bag" around the lower part of the light fitting, but I don't need all that so it can be cut down

    IMG_3771.JPG

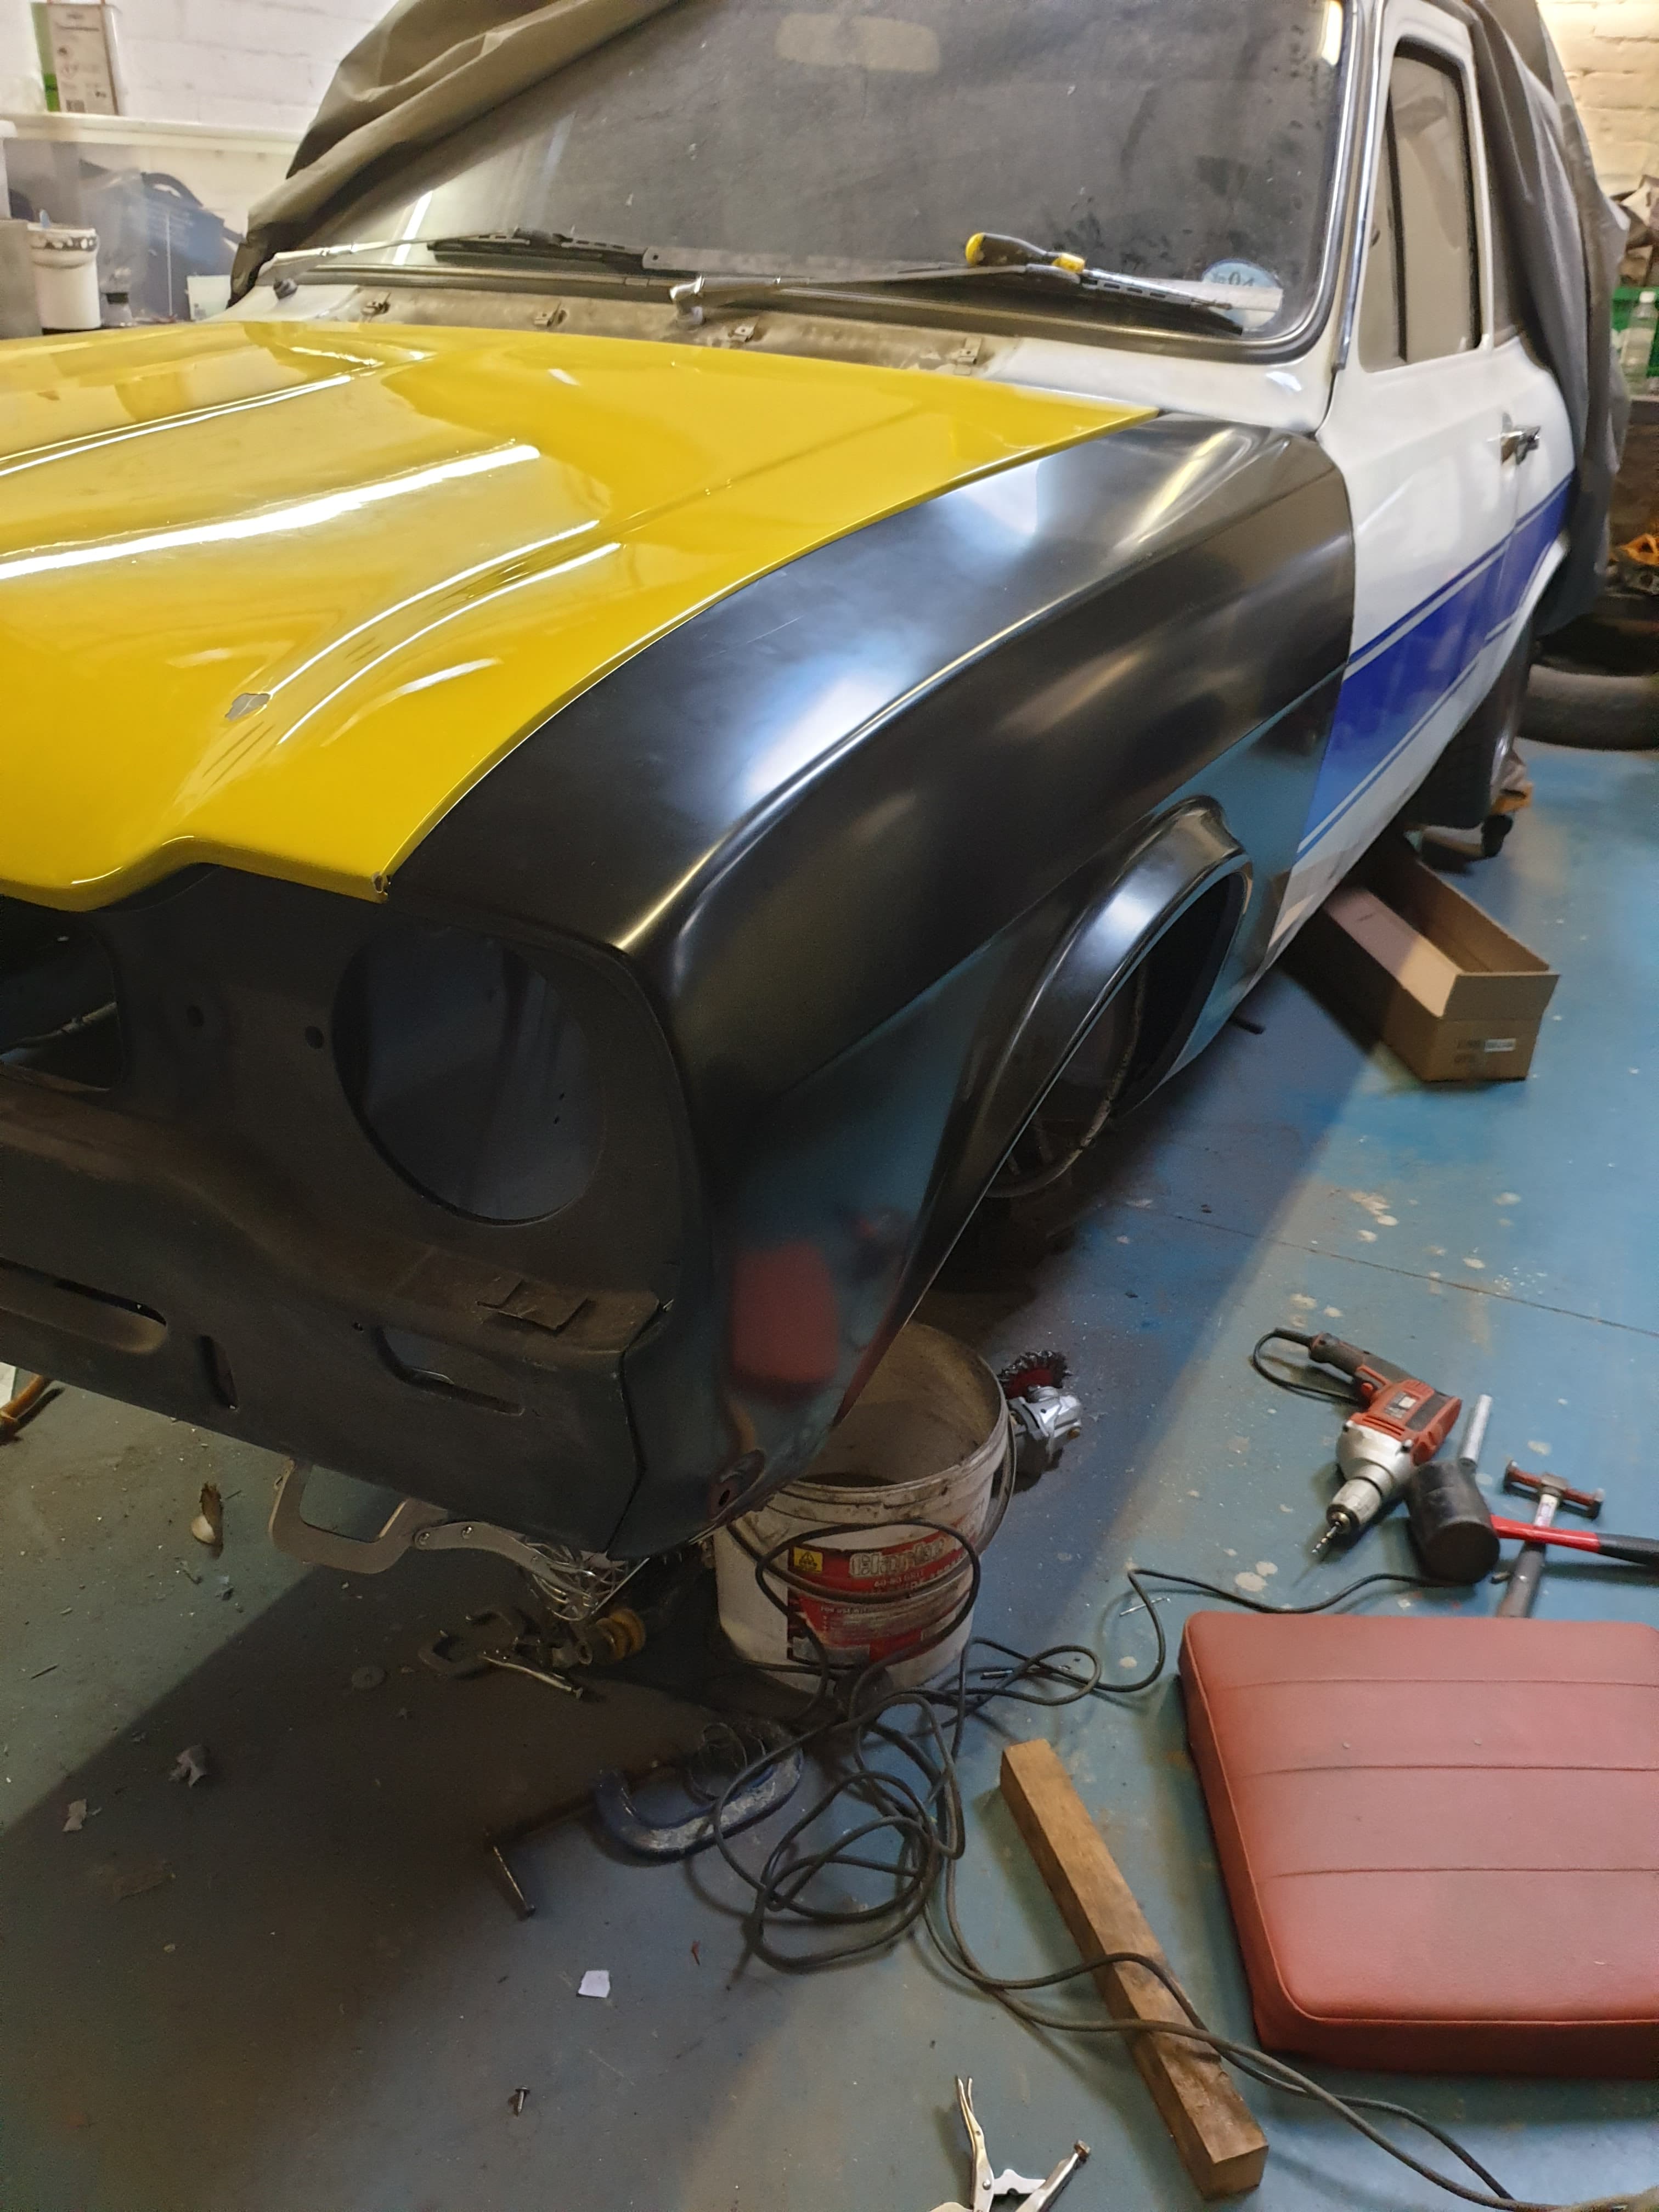
    All cleaned back, surface rust removed (don't want to be transplanting rust in to my shell) and just for belt and braces, I've given them a coat of rust treatment. (why they look black). I've weld filled and ground back the trim holes

  2. #122
    Mechanic

    My 1st Project
    Join Date
    Apr 2017
    Location
    Essex
    Age
    53
    Posts
    797
    Thanks
    102
    Thanked 115 Times in 101 Posts

    Re: 1977 Mk2 Zakspeed Escort. Rebuilding my pride and joy.

    This is the reason for the rear quarter sections.

    IMG_3772.JPG

    The LH side has been twatted at some point in its past. Didn't know about it when i bought the car, as it had been fairly well re sculptured with filler. But as i'm doing all this other work, I just seemed sensible to fix it properly. That swag line around the corner is quite difficult to recreate nicely. The RH isn't anywhere near as bad as this, but has a few dents and has lost its definition.
    I've trimmed the donor panels back to what I need.

    IMG_3774.JPG

    IMG_3775.JPG

    Plan is to fit them along the original panel joins, so as to reduce the amount of seam welding needed.
    On the LH side I've left in the outer part of the light bracket. Think my one is a bit bent from the time it was twatted.

    No point putting it off so I've cracked on with cutting the LH section out and aligning the donor panel. There's a bit of faffing about to get it right.

    IMG_3777.JPG

    IMG_3778.JPG

    That's more or less where I'm at for now.
    That LH section has been greeting me every time I walk into the garage, so it will be good to not see it again.

  3. #123
    Mechanic

    My 1st Project
    Join Date
    Apr 2017
    Location
    Essex
    Age
    53
    Posts
    797
    Thanks
    102
    Thanked 115 Times in 101 Posts

    Re: 1977 Mk2 Zakspeed Escort. Rebuilding my pride and joy.

    Had a bit of time over the last couple of days so more progress made on the rear end.
    Had to remove the small fillet panel, which was straight forward, and exposed some surface rust in the joint.
    All painted ready for fitting.

    IMG_3788.JPG

  4. #124
    Mechanic

    My 1st Project
    Join Date
    Apr 2017
    Location
    Essex
    Age
    53
    Posts
    797
    Thanks
    102
    Thanked 115 Times in 101 Posts

    Re: 1977 Mk2 Zakspeed Escort. Rebuilding my pride and joy.

    Fair bit of time checking, measuring and marking, before carefully cutting back the shell to size.

    IMG_3789.JPG

    IMG_3790.JPG

    IMG_3791.JPG

    Despite all the time with alignment, On initial taking it went wonky, maybe because I was working late. Good that I kept going back to check. Anyway, decided to down tool and leave for the night. Sorted the next day by cutting the 2 top tacks and re positioning.

    Then on with final fitting/welding.

    IMG_3792.JPG

  5. #125
    Mechanic

    My 1st Project
    Join Date
    Apr 2017
    Location
    Essex
    Age
    53
    Posts
    797
    Thanks
    102
    Thanked 115 Times in 101 Posts

    Re: 1977 Mk2 Zakspeed Escort. Rebuilding my pride and joy.

    Welded and dressed.

    IMG_3793.JPG

    IMG_3794.JPG

    IMG_3796.JPG

    Followed by some zinc primer as normal. And a check of the rear light units. All good.

    IMG_3800.JPG

    IMG_3801.JPG

    IMG_3802.JPG

    I'm really pleased with how this has gone and the final result. I was putting it off as I thought this could be one of those jobs that goes wrong, turns into a pain in the arse and doesn't meet expectations.
    Looking back as i left the garage last night, no more crumpled back end and a nice defined swag line.

  6. #126
    Mechanic

    My 1st Project
    Join Date
    Apr 2017
    Location
    Essex
    Age
    53
    Posts
    797
    Thanks
    102
    Thanked 115 Times in 101 Posts

    Re: 1977 Mk2 Zakspeed Escort. Rebuilding my pride and joy.

    With the Mrs out for the day and free to crack on, I made full use of the time.

    Supports fitted for the rear panel refit.

    IMG_3798.JPG

    And rear panel removed. Still got to clean this up and remove parts of the panel that are spot welded to the strengthening brackets. (Got late for grinding, and I'd been at it for 11hrs)
    On dry fitting, the replacement rear panel seems like a fairly good fit. So hopefully that will go on ok.

    IMG_3799.JPG

    I'm planning to make a start on the spare wheel well and fuel tank well before fitting the rear panel as access is better.
    Still got the RH rear quarter/corner repair to make, but that may wait for now until the back end is together.

  7. #127
    Mechanic

    My 1st Project
    Join Date
    Apr 2017
    Location
    Essex
    Age
    53
    Posts
    797
    Thanks
    102
    Thanked 115 Times in 101 Posts

    Re: 1977 Mk2 Zakspeed Escort. Rebuilding my pride and joy.

    Had a fairly productive month.
    I wasted some time re-constructing the bottom corner of the rear quarter due to a bad cut. (An unthinking moment, cost me about 5 hours).
    Attachment 83758

    Attachment 83756
    Attached Images Attached Images

  8. #128
    Mechanic

    My 1st Project
    Join Date
    Apr 2017
    Location
    Essex
    Age
    53
    Posts
    797
    Thanks
    102
    Thanked 115 Times in 101 Posts

    Re: 1977 Mk2 Zakspeed Escort. Rebuilding my pride and joy.

    Next up the spare wheel well
    Rust, fibreglass, filler and thin air

    IMG_3815.JPG

    Cutting and fitting

    IMG_3821.JPG

    IMG_3822.JPG

    Removed the inner tub to gain access for the inner part of the wheel well, and with it out access for refitting the damper box is a lot easier as it needs clamping. Couple of repairs needed to the tub flange as well.

    IMG_3828.JPG

    IMG_3829.JPG

    IMG_3830.JPG

    IMG_3831.JPG

  9. #129
    Mechanic

    My 1st Project
    Join Date
    Apr 2017
    Location
    Essex
    Age
    53
    Posts
    797
    Thanks
    102
    Thanked 115 Times in 101 Posts

    Re: 1977 Mk2 Zakspeed Escort. Rebuilding my pride and joy.

    Fitting and aligning the Inner tub.
    Looked ok on initial fitting, looking back at pictures of the original tub, it was sitting too low against the floor flange. So a shove up and clamping was needed. Only about 10mm, but it makes a difference to the fit and alignment of the whole tub.
    IMG_3837.JPG

    Black line was from initial fitting.

    IMG_3838.JPG

    The shove up also twisted the rear edge to become square as it should be.

    IMG_3840.JPG

    Inner well panel welded and dressed. I left the bottom join until last as joining the 2 at this stage makes fitting the tub almost impossible. So its bolted together front and back for alignment.
    The inner wheel well panel is too short and needs re-working to mate up to the rear of the tub.
    See :- 1978 mk2 Mexico. thread by mk2-mad-ad for a really good detailed description of this.

    IMG_3844.JPG

    Damper box back in. Cut a section out the RH tub for access for clamping
    IMG_3846.JPG

    Outer section seem welded, dressed and painted

    IMG_3843.JPG

    Final fitting of the tub

    IMG_3897.JPG

    including the wiring loom fixings and bulk head card bracket

    IMG_3898.JPG

  10. #130
    Mechanic

    My 1st Project
    Join Date
    Apr 2017
    Location
    Essex
    Age
    53
    Posts
    797
    Thanks
    102
    Thanked 115 Times in 101 Posts

    Re: 1977 Mk2 Zakspeed Escort. Rebuilding my pride and joy.

    Happy with that

    IMG_E3923.JPG

    IMG_3929.JPG

  11. #131
    Mechanic

    My 1st Project
    Join Date
    Apr 2017
    Location
    Essex
    Age
    53
    Posts
    797
    Thanks
    102
    Thanked 115 Times in 101 Posts

    Re: 1977 Mk2 Zakspeed Escort. Rebuilding my pride and joy.

    Rear panel was on and off for alignment checking. It fits really well, and I'm glad I went with just the outer skin rather than a complete panel with strengthener. Inside of the strengthener cleaned up and painted. Had just a little surface rust.
    IMG_3845.JPG

    I noticed whilst doing this the strengthener at the RH end where it joins to the rear light bracket was miss-shaped, the top edge being bent up. There's no outer damage there and the paint was in-tacked, so can only assume original build damage. A little hammer work has straitened it out, back into a box section.

  12. #132
    Mechanic

    My 1st Project
    Join Date
    Apr 2017
    Location
    Essex
    Age
    53
    Posts
    797
    Thanks
    102
    Thanked 115 Times in 101 Posts

    Re: 1977 Mk2 Zakspeed Escort. Rebuilding my pride and joy.

    On to the RH side, fuel tank well.
    More rust, filler, fibre glass and thin air

    IMG_3901.JPG

    I've worked this side differently based on experience of the spare wheel well

    I removed the inner tub first then fitted the inner panel, leaving the outer panel to last. Cross checking with the fuel tank and again using the rear panel as part of the alignment

    IMG_3900.JPG

    The floor to tub flange needed to be repaired along about 90% of its length

    IMG_E3902.JPG

    Finished off and shaped

    IMG_3917.JPG

    Inner panel fitted and dressed off.

    IMG_3919.JPG

    Inner tub dry fitting. The inner panel is a better fit here than the one for the spare wheel. No extension required.

    IMG_3914.JPG

    IMG_3912.JPGT

    Welded in

    IMG_3913.JPG

    IMG_3927.JPG

  13. #133
    Mechanic

    My 1st Project
    Join Date
    Apr 2017
    Location
    Essex
    Age
    53
    Posts
    797
    Thanks
    102
    Thanked 115 Times in 101 Posts

    Re: 1977 Mk2 Zakspeed Escort. Rebuilding my pride and joy.

    There's a week or so gap in posts but this was all complete before, just no time to finish the update.
    Outer panel done and this section is complete. I only used the very bottom part including the arch so I can cut it back later for the outer tub, as per the LH side
    IMG_3922.JPG

    Brackets done
    IMG_3924.JPG

    and all painted
    IMG_3928.JPG

  14. #134
    Mechanic

    My 1st Project
    Join Date
    Apr 2017
    Location
    Essex
    Age
    53
    Posts
    797
    Thanks
    102
    Thanked 115 Times in 101 Posts

    Re: 1977 Mk2 Zakspeed Escort. Rebuilding my pride and joy.

    Having done all that, I thought i'd check how the rear arches would fit.
    The original holes are still there in the body sides and the arches, so easy to dry fit with my quick release pins.

    IMG_3930.JPG
    Really happy with the fit, considering how much has been removed and refitted, the arches line up fine. The LH one needs a section of the fibre glass cut away at the bottom to fit around the spare wheel well bulge to sit flush at the back. The previous wheel well not really existing before, that wasn't necessary.

    IMG_3931.JPG
    A little trimming needed, but not much. The fit is so much better now.

    IMG_3935.JPG

  15. #135
    Mechanic

    My 1st Project
    Join Date
    Apr 2017
    Location
    Essex
    Age
    53
    Posts
    797
    Thanks
    102
    Thanked 115 Times in 101 Posts

    Re: 1977 Mk2 Zakspeed Escort. Rebuilding my pride and joy.

    was so good to see the arches on, even if it was just for half an hour before putting them back in to storage

  16. #136
    Mechanic

    My 1st Project
    Join Date
    Apr 2017
    Location
    Essex
    Age
    53
    Posts
    797
    Thanks
    102
    Thanked 115 Times in 101 Posts

    Re: 1977 Mk2 Zakspeed Escort. Rebuilding my pride and joy.

    On to the rear panel

    needed a little doubler / extension plate at the back of the fuel tank well. It fitted up to the rear panel, but I just thought the little extension would make it a better job, and its not really visible from underneath or above.
    White dots are for the drilling.

    IMG_E3941.JPG

    Dry fitted for marking up to drill plug weld holes.
    IMG_3942.JPG

    Plug weld holes drilled, there's a lot of them as the rear panel interacts with so many other panels at the back.
    Took a fair bit of time to do this, and I primed and painted the areas that will be closed once fitted, including the inside of the strengthener.
    IMG_3961.JPG
    IMG_3972.JPG

  17. #137
    Mechanic

    My 1st Project
    Join Date
    Apr 2017
    Location
    Essex
    Age
    53
    Posts
    797
    Thanks
    102
    Thanked 115 Times in 101 Posts

    Re: 1977 Mk2 Zakspeed Escort. Rebuilding my pride and joy.

    Fitted and welded.
    IMG_3973.JPG

    Had to do a bit of adjustment with a hammer and block at the bottom around when the rear of the chassis rails meet the panel. Possibly I made the small plates at the back of the chassis rails a bit too narrow and tight so I couldn't tap them back to take up the gap. So had to knock the panel in a bit, more so on the LH side. That will disappear under a skim of filler.
    IMG_3975.JPG

    Dressed back, primed and supports removed
    IMG_3990.JPG

  18. #138
    Mechanic

    My 1st Project
    Join Date
    Apr 2017
    Location
    Essex
    Age
    53
    Posts
    797
    Thanks
    102
    Thanked 115 Times in 101 Posts

    Re: 1977 Mk2 Zakspeed Escort. Rebuilding my pride and joy.

    The only thing that really lets the magnum rear panel down is the corners of the rear light recess.
    The pressing process requires or causes a split in the corner and they don't wrap around like the original.
    Didn't notice until it was fitted
    IMG_3986.JPG

    It may not seem like much but when the light is installed, there's a fair gap in the top and bottom corners. Not good as water will get in and run into the wheel and fuel tank well, and we know that that means ...
    The solution I found, cut the corners out the original panel
    IMG_3985.JPG

    And weld them in, one from the back the other from the front as I couldn't access from the back
    IMG_3987.JPG

    That's better
    IMG_3988.JPG
    IMG_3991.JPG

  19. #139
    Mechanic

    My 1st Project
    Join Date
    Apr 2017
    Location
    Essex
    Age
    53
    Posts
    797
    Thanks
    102
    Thanked 115 Times in 101 Posts

    Re: 1977 Mk2 Zakspeed Escort. Rebuilding my pride and joy.


  20. #140
    Mechanic

    My 1st Project
    Join Date
    Apr 2017
    Location
    Essex
    Age
    53
    Posts
    797
    Thanks
    102
    Thanked 115 Times in 101 Posts

    Re: 1977 Mk2 Zakspeed Escort. Rebuilding my pride and joy.

    Some of the parts that came back from media blasting / powder coating. All now wrapped and stored. Love seeing this stuff come back clean and fresh, whilst the pile of dirty, rusty stuff on the shelves is reducing.
    IMG_3995.JPG

    IMG_4002.JPG

    seat supports are painted not powder coated.
    IMG_3994.JPG

    Hubs to be painted silver. wasn't worth the cost of powder coating.
    IMG_4003.JPG

  21. #141
    Mechanic

    My 1st Project
    Join Date
    Apr 2017
    Location
    Essex
    Age
    53
    Posts
    797
    Thanks
    102
    Thanked 115 Times in 101 Posts

    Re: 1977 Mk2 Zakspeed Escort. Rebuilding my pride and joy.

    Front chassis rails arrived.

    IMG_3997.JPG

    I added a few tack welds to the internal plates and spots where cuts had been made during manufacture for folding the edges. just looks tidier, as well as reducing the chance of a weak spot.
    IMG_3998.JPG
    IMG_3999.JPG

    De-greased, and painted ready for fitting.
    IMG_4008.JPG

    That's it, up to date here.
    Done some prep work in the garage, moving stuff around, so ready to make a start on the front end hopefully in the next couple of days

  22. #142
    Spanner Monkey

    Join Date
    Jan 2013
    Location
    Wellington, NZ
    Posts
    208
    Thanks
    23
    Thanked 11 Times in 11 Posts

    Re: 1977 Mk2 Zakspeed Escort. Rebuilding my pride and joy.

    Thanks for the updates, really good following this, it’s a good reflection of how much time and effort is involved. Keep it up! Cheers.

  23. The Following User Says Thank You to nathanblaise For This Useful Post:


  24. #143
    Mechanic

    My 1st Project
    Join Date
    Apr 2017
    Location
    Essex
    Age
    53
    Posts
    797
    Thanks
    102
    Thanked 115 Times in 101 Posts

    Re: 1977 Mk2 Zakspeed Escort. Rebuilding my pride and joy.

    Thanks Nathan, appreciate your comments, good to know my updates are of interest to others. I’m trying to include information and details someone else may find useful.
    I’ve cut the front LH inner wing and chassis rail off today. Pics to follow when time allows
    Cheers

  25. #144
    Mechanic

    My 1st Project
    Join Date
    Apr 2017
    Location
    Essex
    Age
    53
    Posts
    797
    Thanks
    102
    Thanked 115 Times in 101 Posts

    Re: 1977 Mk2 Zakspeed Escort. Rebuilding my pride and joy.

    LH inner wing and chassis removed back at the end of April.
    No going back from here....
    Attached Images Attached Images

  26. #145
    Mechanic

    My 1st Project
    Join Date
    Apr 2017
    Location
    Essex
    Age
    53
    Posts
    797
    Thanks
    102
    Thanked 115 Times in 101 Posts

    Re: 1977 Mk2 Zakspeed Escort. Rebuilding my pride and joy.

    As the inner wings, chassis rails and front panel were all fairly knackered I cut through the LH end of the front panel and through the inner wing just in front of the bulkhead join, then ground back the inner wing to bulkhead flange. The chassis rail was bolted to the floor pan from earlier when the floor was replaced.

    First up was fitting the chassis rail. The original wasn't straight and square, so I really wanted to sort that out.
    In case you're just dipping in here, I'm using Motor Sport Tools, Heavy duty front chassis rails.

    IMG_4043.JPG

    Hopefully this is where the time spent making alignment brackets and taking lots of measurements will pay off.

    IMG_4044.JPG

    Had to use my cable hoist to help with the squaring up

    IMG_4045.JPG

    I used an axle stand and packing to jam the end up to the floor. The centre rail holds it in place.

    Before drilling to bolt it to the floor pan I had to squeeze the outer part into line

    IMG_4046.JPG

    Hopefully the pictures are ok. On the laptop they are correct.

  27. #146
    Mechanic

    My 1st Project
    Join Date
    Apr 2017
    Location
    Essex
    Age
    53
    Posts
    797
    Thanks
    102
    Thanked 115 Times in 101 Posts

    Re: 1977 Mk2 Zakspeed Escort. Rebuilding my pride and joy.

    I had to do a little trimming, and there's a bit of a gap to be dealt with

    IMG_4042.JPG

  28. #147
    Mechanic

    My 1st Project
    Join Date
    Apr 2017
    Location
    Essex
    Age
    53
    Posts
    797
    Thanks
    102
    Thanked 115 Times in 101 Posts

    Re: 1977 Mk2 Zakspeed Escort. Rebuilding my pride and joy.

    Works been unusually quiet, so I've not wasted the time.
    The Rail is bolted to the floor, with the the X-member and ARB brackets in place.
    Next up checking the inner wing alignment.

    IMG_4047.JPG

    IMG_4049.JPG

    Little bit of trimming needed and adjustment needed to the rear edge wing/bulkhead section.

    Initial fitting and there's this gap to pull in.
    IMG_4050.JPG

    This alignment took a good few hours, with the wing on and off adjusting a little at a time.

    IMG_4053.JPG
    The bumper bolts help pull the wing into the chassis rail.

    IMG_4054.JPG

    All the important points now aligned, the wing and rail as square as I could make it

  29. #148
    Mechanic

    My 1st Project
    Join Date
    Apr 2017
    Location
    Essex
    Age
    53
    Posts
    797
    Thanks
    102
    Thanked 115 Times in 101 Posts

    Re: 1977 Mk2 Zakspeed Escort. Rebuilding my pride and joy.

    It's time to start welding the chassis rail on. Overall these rails are a really good fit. I've only seen a review of them once before, and that wasn't so good, but that's not my experience.
    The main issue was the join between the front and middle rails. The problem here is actually the (Magnum) middle rails. The front section isn't deep enough to meet the rear section of the front rail. I considered extending the front of the middle section, but decided it would be far easier to adjust the front rail.

    IMG_4051.JPG

    IMG_4052.JPG

    IMG_4055.JPG

    The rail is then stitch welded along the horizontal section of floor and plug welded where the floor slopes up to the bulkhead. I've still got to plug weld the bolt holes and a bit of panel beating to close up a gap. I'll probably have to put in a few more stitch welds in a couple of places as I don't think i'll be able to get the floor and the rail flange flush.
    This will be done when it goes back on the spit.

  30. #149
    Mechanic

    My 1st Project
    Join Date
    Apr 2017
    Location
    Essex
    Age
    53
    Posts
    797
    Thanks
    102
    Thanked 115 Times in 101 Posts

    Re: 1977 Mk2 Zakspeed Escort. Rebuilding my pride and joy.

    Bulkhead prepared for fitting the inner wing.
    Surprisingly there was only 9 spot welds on the original wing flange. I drilled the bulkhead for the plug welds, as it's easier to get into weld and then dress them back. I added a few extra welds.
    Also had an extra drilled hole to fill. I had put it there back in the day to run additional wiring for up-rated lights.

    IMG_4068.JPG

  31. #150
    Mechanic

    My 1st Project
    Join Date
    Apr 2017
    Location
    Essex
    Age
    53
    Posts
    797
    Thanks
    102
    Thanked 115 Times in 101 Posts

    Re: 1977 Mk2 Zakspeed Escort. Rebuilding my pride and joy.

    Final fitting and welding of the LH inner wing / chassis rail

    IMG_4074.JPG
    Drilled for plug welding
    The front hole in the wing doesn't line up with the hole in the chassis rail. This is one of the forward shell datum points, it's not a fixing point. I think the hole in the chassis rail is incorrect, but it's not an issue here as I've already used that point to measure off and fit the rear chassis sections and my alignment jig for the front end. It may be something to consider if starting from the front on a rebuild, but not a problem that couldn't be worked around.

    IMG_4075.JPG
    All the gaps closed up

    IMG_4076.JPG

    There is of course a bit of hammer and dolly adjustment needed to finish this all of that can only be done at the last stages as the welding is done. Overall the Magnum wing and motor sport tools chassis work well together.

  32. #151
    Mechanic

    My 1st Project
    Join Date
    Apr 2017
    Location
    Essex
    Age
    53
    Posts
    797
    Thanks
    102
    Thanked 115 Times in 101 Posts

    Re: 1977 Mk2 Zakspeed Escort. Rebuilding my pride and joy.

    To ensure stability in the geometry I put in a strut to hold the new wing/chassis section before removing the RH wing/chassis. This is because I've used the RH side as a datum as it was straight and square. Not sure it was really needed but better safe than sorry and didn't need any real effort or time.

    IMG_4548.JPG

  33. #152
    Mechanic

    My 1st Project
    Join Date
    Apr 2017
    Location
    Essex
    Age
    53
    Posts
    797
    Thanks
    102
    Thanked 115 Times in 101 Posts

    Re: 1977 Mk2 Zakspeed Escort. Rebuilding my pride and joy.

    Then off with the RH side.

    IMG_4550.JPG

    Fitting is the same as the LH side.

    IMG_4568.JPG

    IMG_4571.JPG

    IMG_4572.JPG

    IMG_4589.JPG

    Really pleased with how this job went. I managed to more or less straighten up the original built in twist on the LH side to.

  34. #153
    Mechanic

    My 1st Project
    Join Date
    Apr 2017
    Location
    Essex
    Age
    53
    Posts
    797
    Thanks
    102
    Thanked 115 Times in 101 Posts

    Re: 1977 Mk2 Zakspeed Escort. Rebuilding my pride and joy.

    Next up the front panels. Usual format of dry fitting, removing, adjusting, dry fitting.

    Front inner panel is a fair fit initially. It sits high on the RH side and there's a 10-15mm gap in a couple of places both sides.
    IMG_4583.JPG

    This is the captive nut for the ARB bracket front fixing bolt. So you can see how much the panel needed pulling down. Getting this aligned was a slow process as the panel isn't that flexible due to it's form. I used a combination of G-clamps, welding clamps and packing, slowly winding it down into position, clamping, adjusting and so on.
    IMG_4585.JPG

    Side gaps.
    IMG_4584.JPG

    IMG_4586.JPG

    Adjusting and closing up gaps.
    IMG_4590.JPG

    IMG_4588.JPG

    With the inner panel in place, bolted in place, I checked the front panel alignment before welding.
    IMG_4598.JPG
    Again a fair fit straight off.

  35. #154
    Mechanic

    My 1st Project
    Join Date
    Apr 2017
    Location
    Essex
    Age
    53
    Posts
    797
    Thanks
    102
    Thanked 115 Times in 101 Posts

    Re: 1977 Mk2 Zakspeed Escort. Rebuilding my pride and joy.

    I decided to stitch weld the inner panel in place down the sides. It's easier to get to, less time consuming and wont really be visible, and is probably a bit stronger/rigid than plug welding.

    IMG_4605.JPG

    IMG_4606.JPG

    IMG_4603.JPG

    I plug welded the section that sits on top of the Inner wings

  36. #155
    Mechanic

    My 1st Project
    Join Date
    Apr 2017
    Location
    Essex
    Age
    53
    Posts
    797
    Thanks
    102
    Thanked 115 Times in 101 Posts

    Re: 1977 Mk2 Zakspeed Escort. Rebuilding my pride and joy.

    Front panel was fairly straight forward. Just make sure its square and centred correctly before welding. Again I used a combination of plug welding and stitch welding depending on access and how viable the areas are.

    IMG_4609.JPG

    Majority of the welds have been done on the backside of the panel to save too much cleaning up on the visible areas. More important if you're building a flat front car.

  37. #156
    Racer Decade Plus User Stevie's Avatar

    Join Date
    Aug 2002
    Location
    Geordie Land
    Age
    57
    Posts
    2,232
    Thanks
    8
    Thanked 11 Times in 10 Posts

    Re: 1977 Mk2 Zakspeed Escort. Rebuilding my pride and joy.

    just done this on my mk1 and the magnum panels are a bad fit for the most worst being the rs wing just spent 5 hours just to get it to fit and still some fettling to do before welding on so i feel your pain keep it up


    MY MK1 ESCORT (Now turbo'd)

  38. The Following User Says Thank You to Stevie For This Useful Post:


  39. #157
    Mechanic

    My 1st Project
    Join Date
    Apr 2017
    Location
    Essex
    Age
    53
    Posts
    797
    Thanks
    102
    Thanked 115 Times in 101 Posts

    Re: 1977 Mk2 Zakspeed Escort. Rebuilding my pride and joy.

    Despite all the new panels going on, I am trying to re-use as much of the original car as possible.
    Here's the chassis strengtheners recovered, cleaned, primed and ready for fitting.

    IMG_4610.JPG

    Had a day fitting front strengthening. Not really necessary for a road car, but I had them, a bit of the "boy racer" in me

    IMG_4666.JPG

    IMG_4667.JPG

    IMG_4668.JPG

    IMG_4669.JPG

    The original chassis strengtheners just went straight on, no fitting issues at all.

    IMG_4670.JPG

    Really pleased with how this has all gone.
    All primed.
    IMG_4674.JPG

  40. #158
    Mechanic

    My 1st Project
    Join Date
    Apr 2017
    Location
    Essex
    Age
    53
    Posts
    797
    Thanks
    102
    Thanked 115 Times in 101 Posts

    Re: 1977 Mk2 Zakspeed Escort. Rebuilding my pride and joy.

    Seemed like the right time to re fit the heater bubble now and check the scuttle panel alignment. I'm going to use riv-nuts to fix the scuttle panel rather than wending it or self tapping screws.

    IMG_4678.JPG

    IMG_4676.JPG

    IMG_4675.JPG

  41. #159
    Mechanic

    My 1st Project
    Join Date
    Apr 2017
    Location
    Essex
    Age
    53
    Posts
    797
    Thanks
    102
    Thanked 115 Times in 101 Posts

    Re: 1977 Mk2 Zakspeed Escort. Rebuilding my pride and joy.

    Looks ok, but what about the bonnet and wings, will they fit

    Yes they do
    And the wings fit a lot better than they did originally

    IMG_4695.JPG

    I've missed out fitting the wing gusset plates which join the inner wing rail to the bulkhead, I don't have a picture here whilst doing this update, but it's a fairly straightforward job.

    It's been a month and a bit between updates, but actually the front end didn't take as long as I thought, baring in mind the time spent building the jigs and measuring earlier this year. I also lost a week due to nipping the end of my finger off (working in the garden, not the garage), and 5 days away with the Mrs.

    Next up roof panel. And that's already well underway already, just run out of time now to continue here now.
    Thanks for looking. Back soon

  42. #160
    Mechanic

    My 1st Project
    Join Date
    Apr 2017
    Location
    Essex
    Age
    53
    Posts
    797
    Thanks
    102
    Thanked 115 Times in 101 Posts

    Re: 1977 Mk2 Zakspeed Escort. Rebuilding my pride and joy.

    Nice work Stevie, thanks for looking in.
    If it was easy everyone would be at it
    I did some original panels back in the day, and even they needed work to make them fit. And some of the panels on my car, even ford couldn't make them fit when they originally built it despite a full production line... gearbox tunnel as a case in point

+ Reply to Thread

Bookmarks

Posting Permissions

  • You may not post new threads
  • You may not post replies
  • You may not post attachments
  • You may not edit your posts