


Hi mate, Great build and top thread, where did you mount your gearbox oil cooler.? Cheers

Hi mate, Great build and top thread, where did you mount your gearbox oil cooler.? Cheers
I haven't used a gearbox oil cooler as the car will only be used for hillclimbs and sprints so will get very short runs.
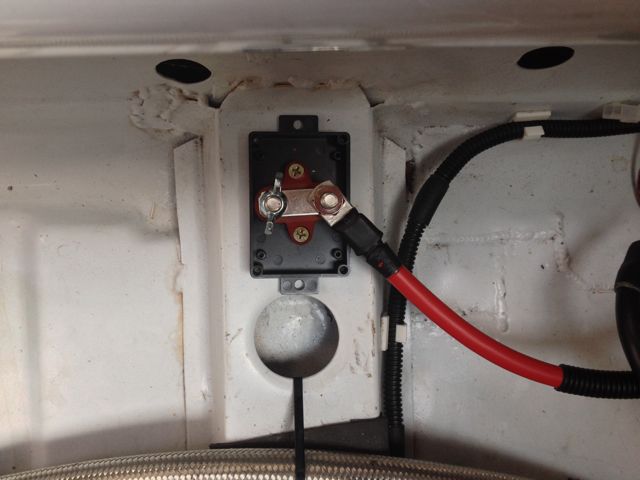
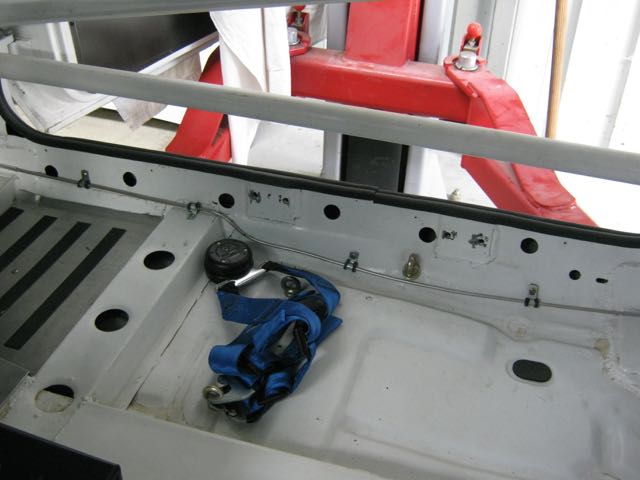
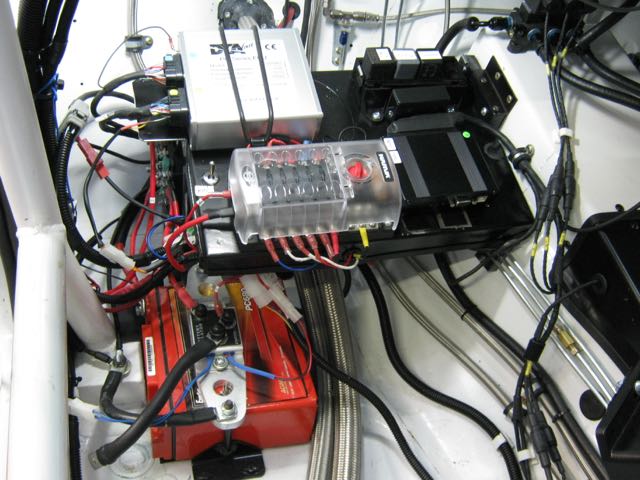
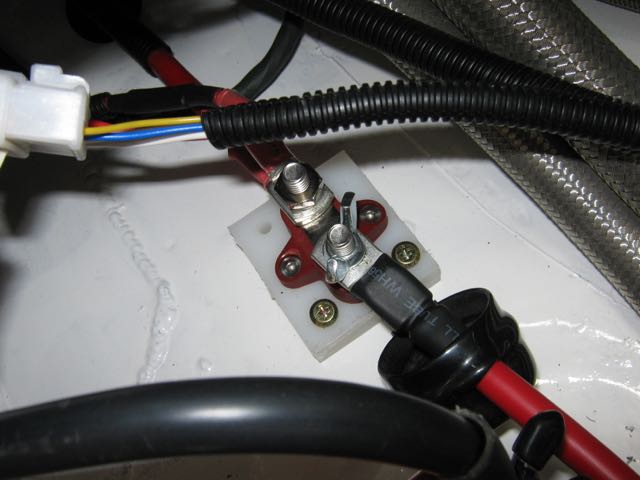
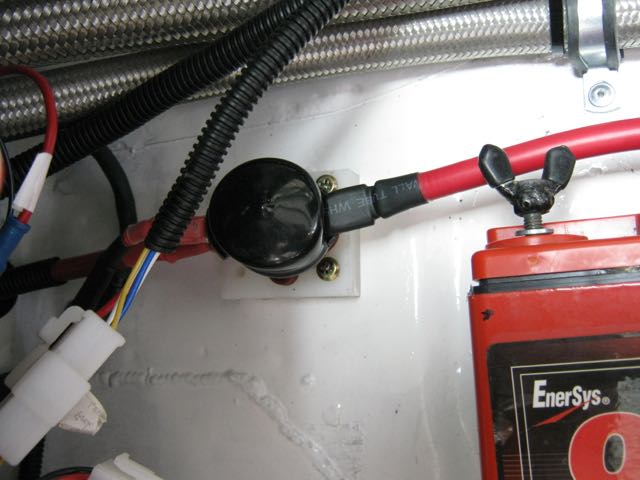
I have had to fix a problem that I had made for myself when I choose where to mount the battery. I realised that if I needed to jump start the car it was impossible to connect a clamp to the positive battery terminal so I have added to the already complex wiring a remote positive terminal.
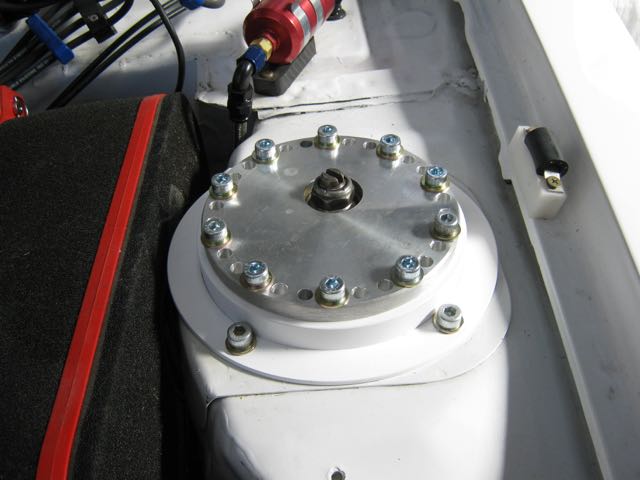
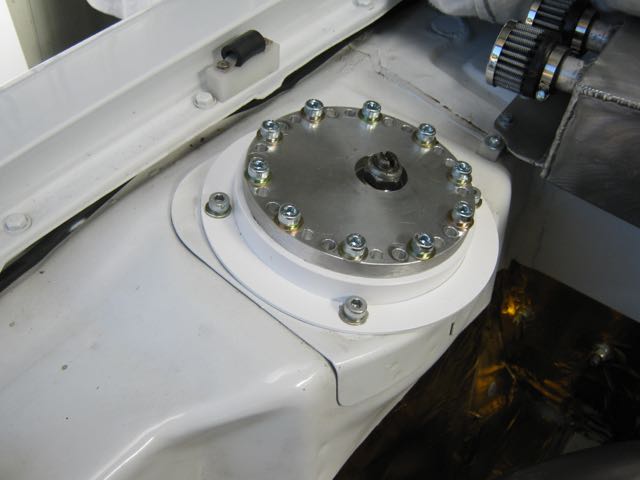
My new breather tank has been welded up and fitted
When there is a pressure build up in the top of the engine oil will be forced into the catch tank and not out the cam seals or half moon seals on the front of the cam cover. There is a drain in the bottom of the tank to allow this excess oil to return to the sump and also allow air to be drawn into the sump through the filters.
I have used clear hoses for now so that I can see what is happening with the oil.
Hopefully this will cure the problem ,if not it will back to
coming on well
Hi i was reading through your awesome build thread.. On page 12 i spotted in your pics that you have cranked steering arms.. I was wondering where u bought them as i'm looking for something similar to eliminate bump steer issues i'm having.. Cheers in advance for any help
I got them from JEMS Racing ... click on their logo in the sponsors banner.
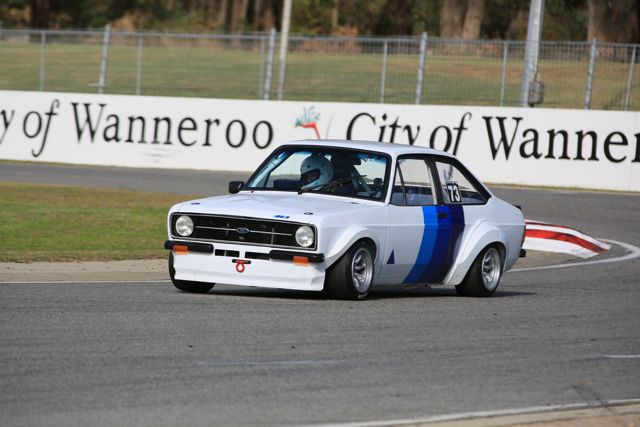
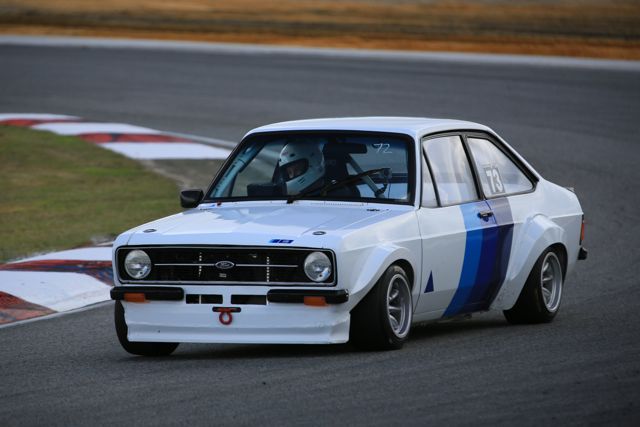
This is the post I have been waiting 5 years to make.
My car had it's competition debut last Saturday in the Western Australian CAMS Speed Event Series Super Sprint. The format being cars sent out in groups of 10 for 5 laps, 1 warm up, 3 timed and a cool down lap. Passing is only allowed on the straights.
I was a bit nervous how it would go because of the lack of testing due to the oil leak issue and not knowing whether it had been fixed.
I took it very easy for the 3 practise laps and then really went for it for the first run.
It was the first time I had really pushed the car and the engine and the first time I have seen the shift lights go out (I have set them to go out at 8500 rpm but the limit is set at 9500 rpm) and I now know why Roy Millington calls his engines "Diamonds" because the engine is absolutely fantastic
It is in a completely different league to the Pinto in my old car. The end of the straights come up much quicker now and the paddle shift is brilliant.
After the first run I brought the car in and checked under the bonnet for oil leaks..... not a drop so we have fixed it at last.
The next stage is to do some more testing to fine tune everything and to do some hillclimbs as I prefer them to going round and round on a circuit.
Here are some photos and in car videos ( try the 720 HD setting ... although I am not completely happy with the quality). I am still having trouble with the dash gear position indicator ( but only 6th now) and the camera mount needs a stay to hopefully cure the waviness on the video.
My mate Mark had a bit of bad luck with his Escort when he lost a wheel on the pit straight when a half shaft broke. Luckily the car didn't suffer any damage.
Well done!!!! Very happy for you
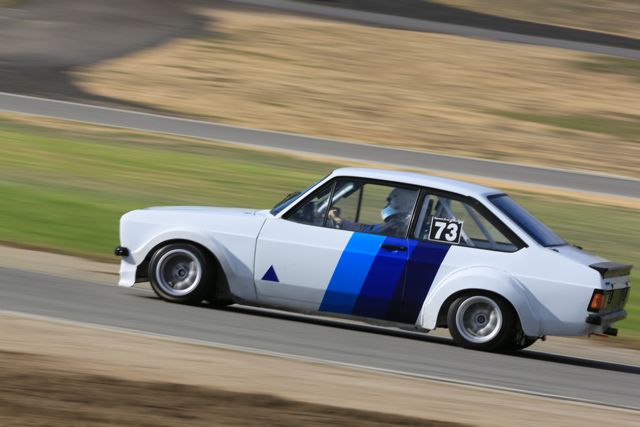
1970 Mk1 Escort Tarmac Rally Car
great news!
Really great build! Well done!
How is the Sadev box working out?
Time for an update.
At the end of last year I had a list of things that needed to be changed or modified on the car so I have spent the last few months sorting these out.
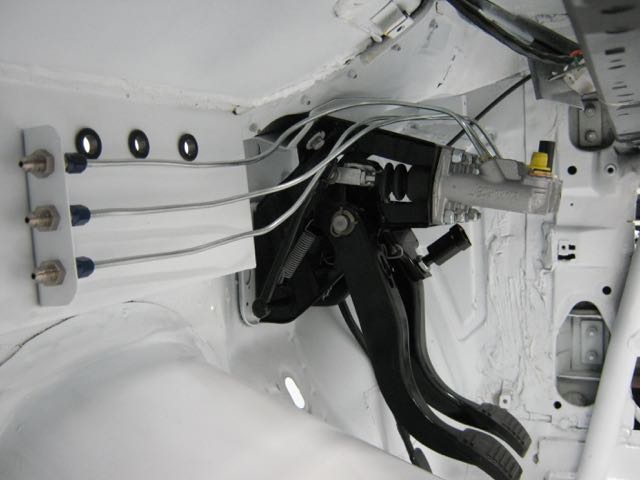
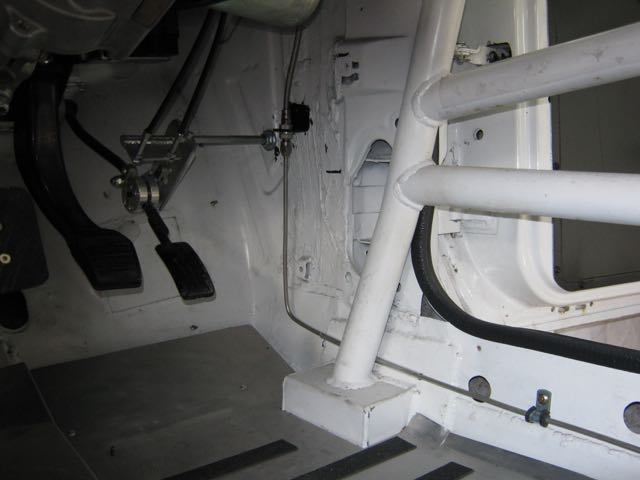
The most important was sorting the brakes. I have not been happy with them as they just didn't seem to be working very well. The pedal had too much travel and there was a slight delay to the braking when pressing the pedal. I was not at all confident in using them at all.
Now I had twin servos on the old car and the brakes were really good but the servos didn't seem to work with the new car so I bypassed them which made things a bit better but the pedal travel was still too much and the "feel" was still not right.
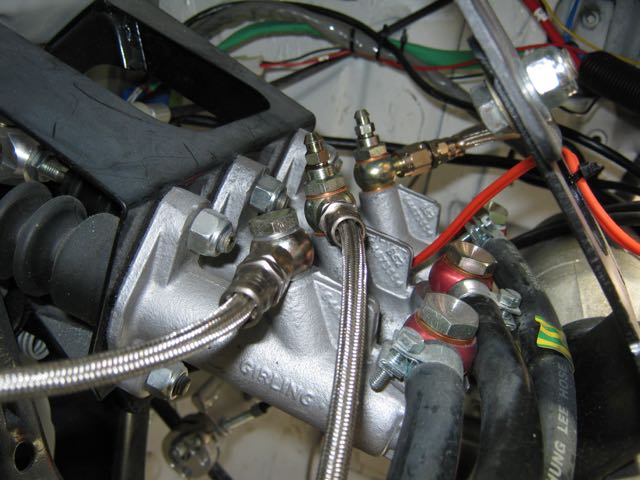
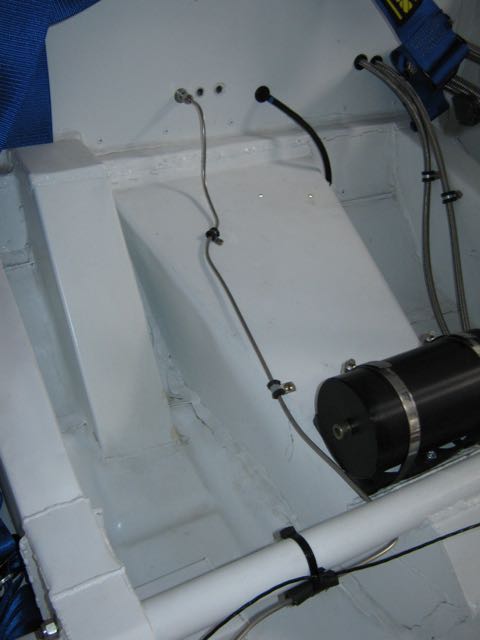
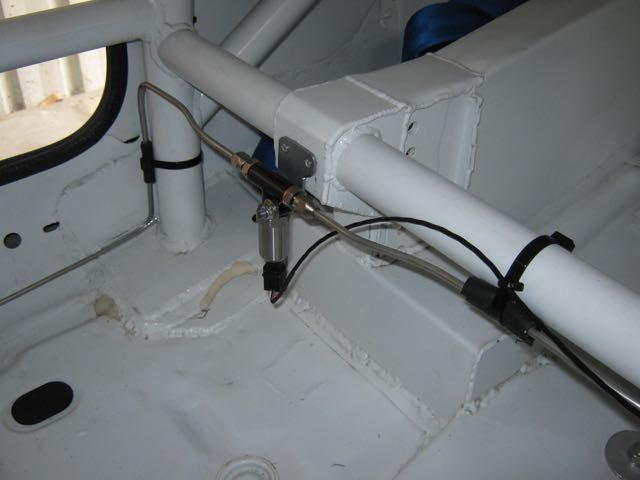
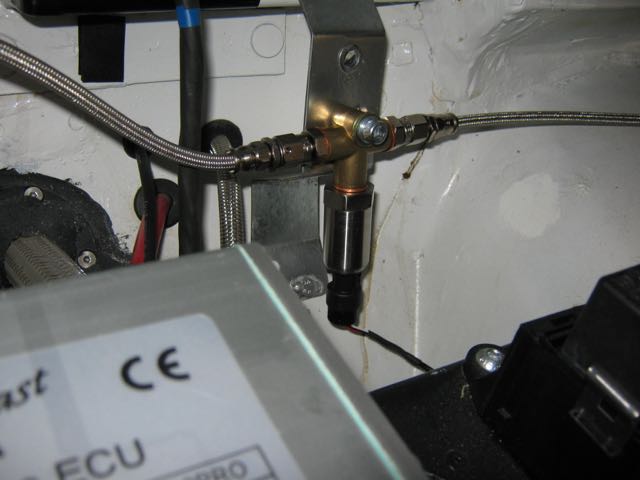
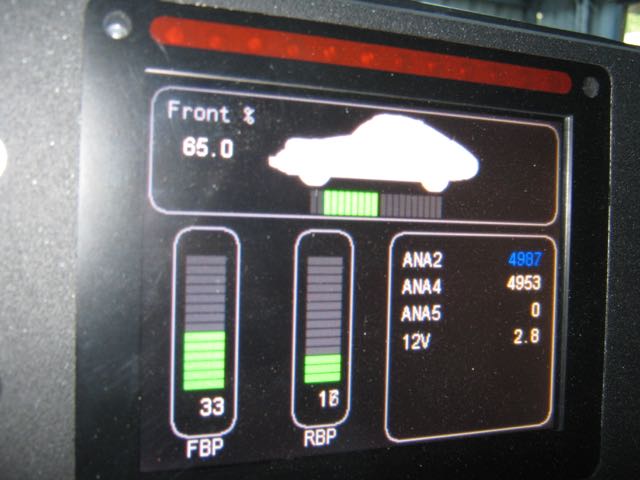
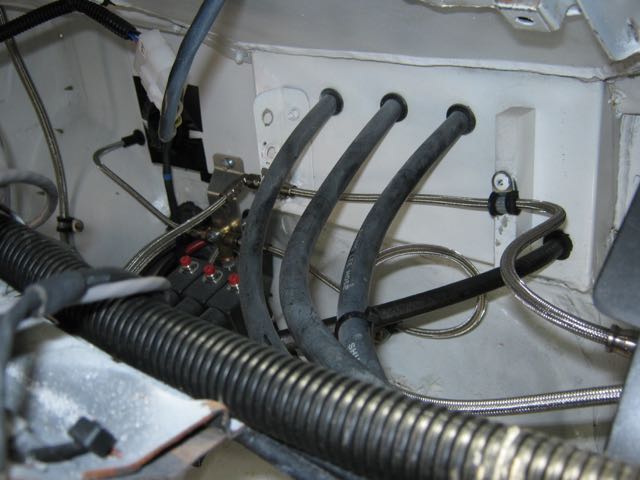
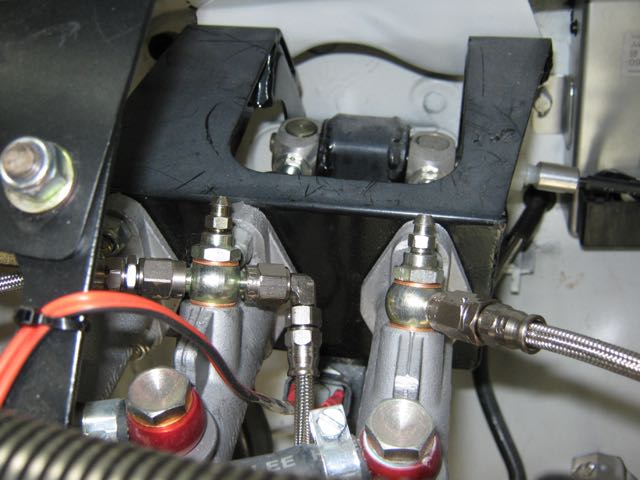
So I decided to redo a lot of it. I removed the servos ( saved 4kg) and most of the braided lines running to the rear brakes.I was able to source some seamless stainless steel hard line and steel 37º flare nuts and I hoped this would solve the problem of the leaks I had with the bundy tube I had used first up ( it did). When I put in the new lines I installed a brake pressure sensor ( very expensive) in each circuit. These plugged straight into the X- Dash to give a digital read out of the front and rear brake pressures.
To reduce the pedal travel I changed the front master cylinder from a 0.625 to a 0.7.
Untidy
Much better
Braided line replaced with seamless hard line to the rear brakes.
Rear brake pressure sensor
Front brake pressure sensor
X-Dash brake pressure screen
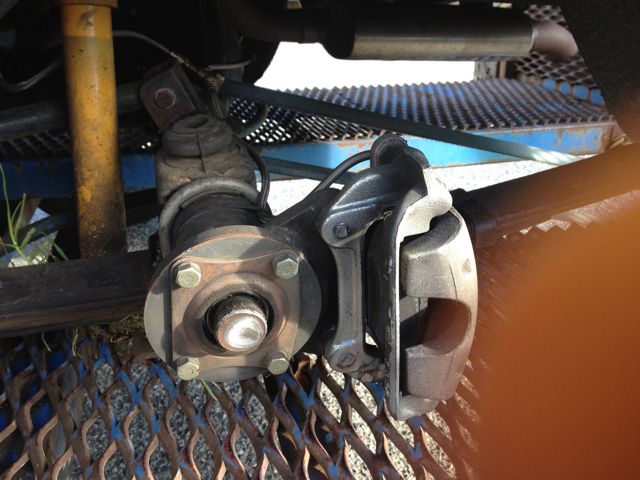
When I removed the wheels I noticed the front and rear discs looked a bit strange. The fronts had a blotchy appearance and the rears looked as though they had overheated. After doing some research on the internet I concluded that the front pads had not bedded in correctly. The blotchy appearance indicated that the pad material had not properly transfered to the discs during the bedding in process. Some more research showed that the Pagid pads needed to be bedded in differently to the Ferodo pads I was used to so I had the discs skimmed and changed to Ferodo DSUNO pads front and rear. These have superseded DS 3000 and are supposed to be really good and not wear discs as much as the DS 3000.
After carefully examining the rear brakes I worked out that the calipers had been rubbing on the outside face of each disc. When they were cold there was enough clearance but obviously when they were hot they grew enough to cause rubbing and overheating of the disc. So I had 1mm machined from each side of the disc to give adequate clearance.
So that was the brakes sorted ..... hopefully.
More off the list next post.
Thanks, glad you like it. The gearbox is fantastic and even better with the paddle shift.Originally Posted by Escortfan_111
Good to see you got to use it on the weekend i watched you YouTube clip you get some serious vibration on the camera mount.
It only seems to be a problem in the upper rev range. I am going to try bracing the mount, if that doesn't work I am told that a gimbal mount should cure that shake.
Found a few more photos of the brake changes.
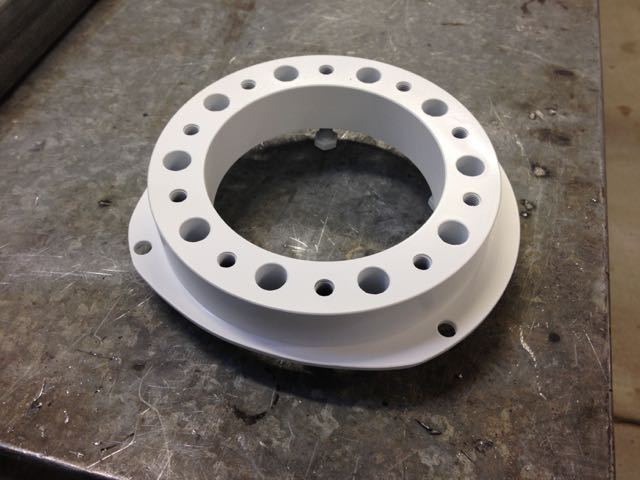
Next on the list was changing the front strut top mounts. When I made the extensions for the mounts I didn't know how high they needed to be so they ended up too high and needed a 25mm spacer to get the correct height. I got some new extensions machined to give the correct height and changed how the top mount is attached. The mount is now on the top of the extension not underneath. This makes it easier to change the spring or bearing.
New extension
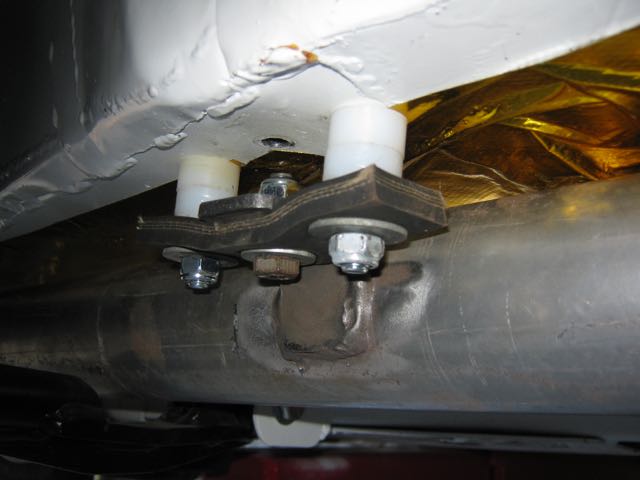
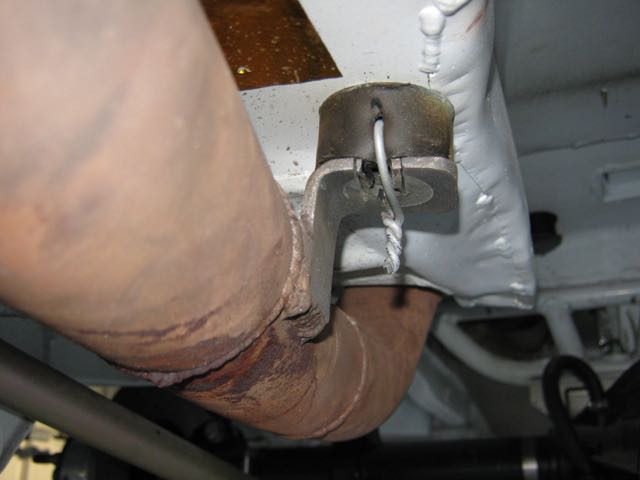
Next on the list was fixing the exhaust as the 2 cotton reel type mounts that hold the centre pipe had failed allowing the pipe to foul the gearbox mount. I was going to modify the mount but with a bit of lateral thinking I worked out that it would be better to modify the pipe. By cutting 15mm off the pipe at the flange where it bolts onto the manifold the pipe was lifted up to give 10mm clearance from the gearbox mount. Job done!
I changed the front mount to something stronger but left the rear mount in with a piece of wire attaching the pipe. A bit agricultural but it will do for now.
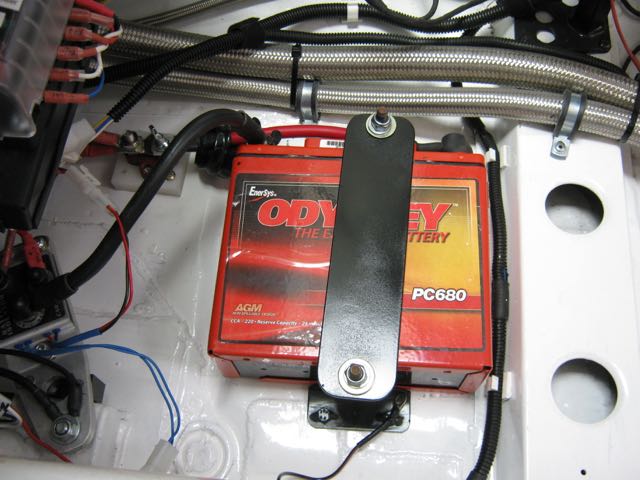
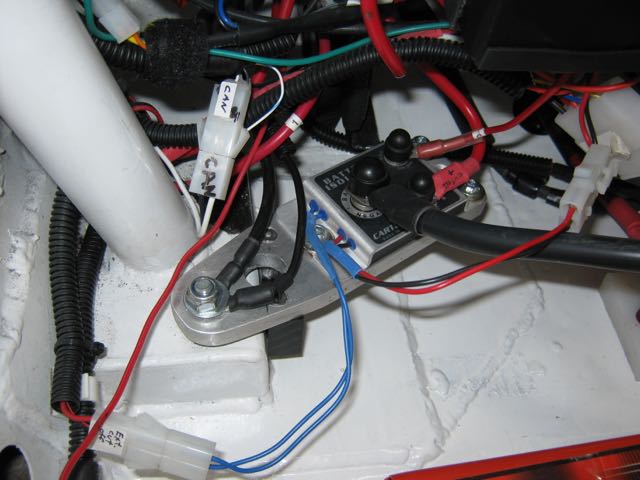
One day I was looking at the battery and noticed a potential problem. As it was mounted, in a crash the roll cage floor mount could short onto the positive terminal. Not a good outcome. So I moved the battery and the cut out module.
Before
After
This gives much better access to to the battery and the connector in the positive cable allows easy connection for jump starting and charging.
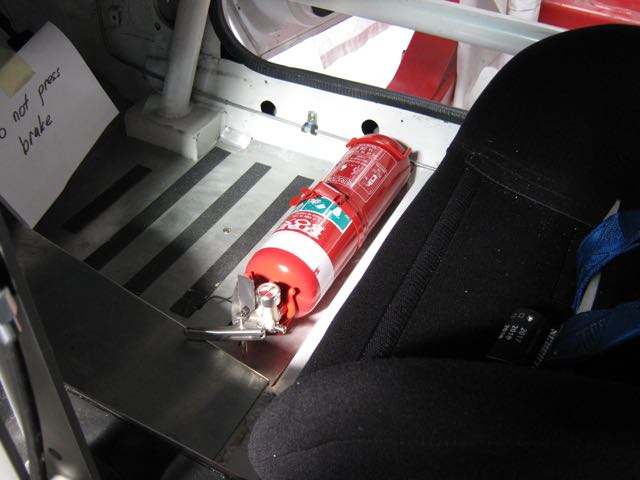
Finally I moved the fire extinguisher to be in front of the driver's seat so I could put a helmet box in it's place.
That's about it.
The next post will be about testing the brakes and a sprint I competed in last weekend.
Once I had finished sorting the items on the list I took the car to my local racetrack for one of their Tuning Days.
The first thing to do was to bed in the new brake pads, making sure I kept out of the way of the other cars on the track. Sometime ago a car came over the crest on the track and ran into the back of a car that was bedding in brakes so I didn't want that to happen to me.
I followed the procedure for bedding the Ferodo pads but was a bit concerned that the car was pulling to the left. As I did more stops this disappeared and when I had finished the bedding process the pedal travel was excellent and the "feel" just right. The only issue was under heavy braking the rears were locking up. I suspected this might happen as I didn't change the rear master cylinder so both the front and rear are 0.7 which in theory should not work but my mate Mark has this set up in his car and it does.
I was going to play around with the bias but the session for closed cars was ended which was a good thing as when I drove into the pits I could hear a loud screeching sound coming from the front of the car.When we took the bonnet off the cause was pretty clear. The bolt that screws into the mounting lug on the water pump for the alternator bracket had sheared causing the drive belt to slip produce the screeching.
We couldn't the broken bit out of the lug so that was game over.
When I got the car home I drilled out the 8mm threaded hole in the lug to 10mm so I could use a bolt and nut with the load on the shoulder of the bolt not the thread.
After doing that I adjusted the brake bias to give a 65%/35% split showing on the X-Dash hoping that would be OK for the upcoming sprint.
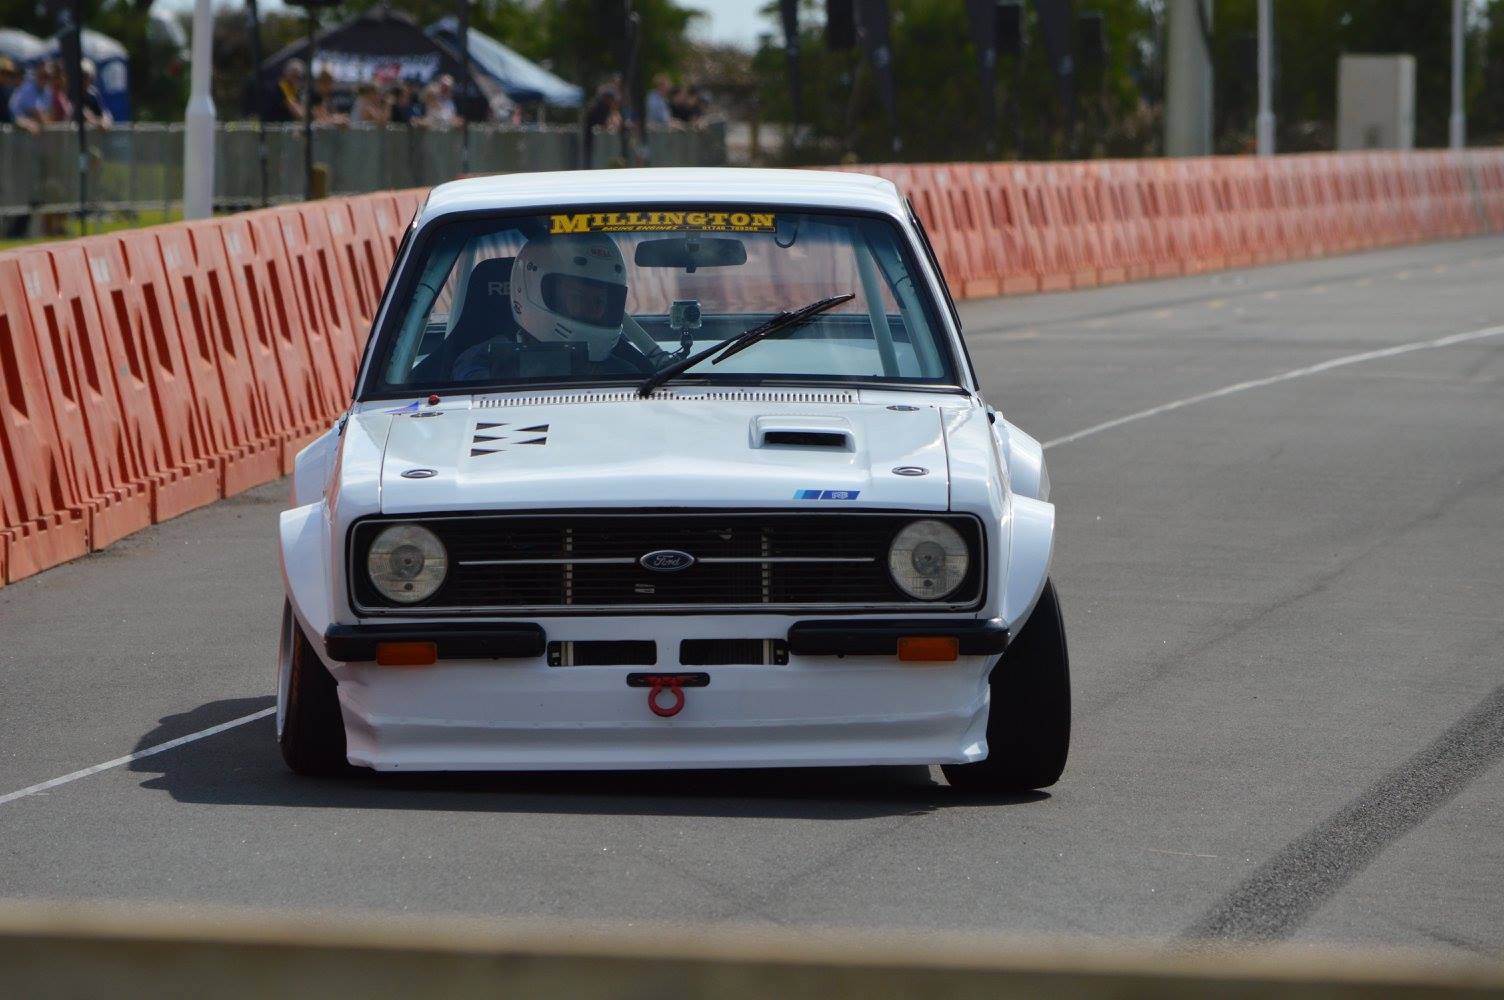
The Western Australian round of the Australian Rally Championship has a Super Special Stage that is used on 2 evenings of the rally and a sprint is held over the stage on the Saturday. I really like this event as it is much more challenging than a race circuit.
John's BMW, Mark's Escort with mine in the pits.
After a practise run I was happy with the brakes, they felt really good and the rears weren't locking so I was able to attack the stage with confidence.
The times for my 4 runs were 1:54:78 , 1:53:08 , 1:52:21 and 1:52:21 which was gave me 7th outright behind some Lancer EVOs, WRXs and a sports racer ( the FTD was 1:47:26).
I was really pleased with this especially as I had beaten the 600bhp V8 Capri that usually beats me on circuits by 1sec.
Here is the in-car video of my last run
https://www.youtube.com/watch?v=47bm2ukB2sY
very nice...great job ..cheers mark
I've only just come across this thread. What a lovely job you have done. Nice engineering and solutions. Top work mate!
Please 'Like' us on FB!
https://www.facebook.com/pages/Jana-Kitchen-UK/393933930736835?ref=hl
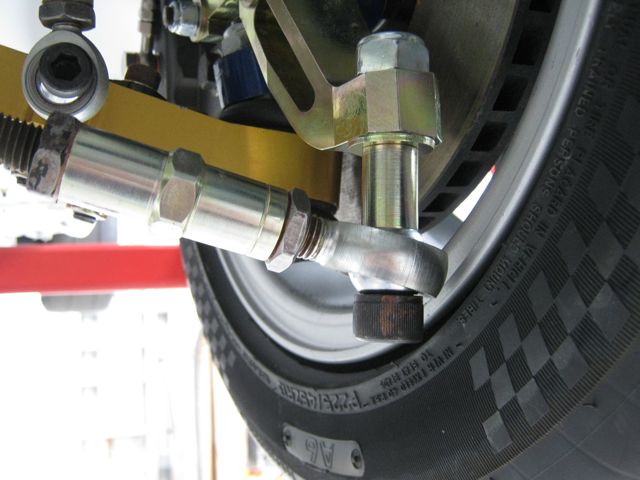
i like the stut top spacer solution but what have you got 4 bolt holding the spacer on and 10 bolts holding that stut top on? i only use 3 and its a gravel car. also i like the side bonnet stops but why have you had to make the higher than standard rubber ones?
The 4 bolts on the spacer really only locate the spacer in the wing, the flange on the spacer takes the load on the shell.
When the strut top is placed on top of the wing/spacer then all the load ( in compression ) is on the bolt threads so I have used 10 bolts ( and the thread tapped into the spacer is 30mm deep ) as it would be pretty disastrous if it fails.
If the car was subject to jumps like a rally car I would have done things differently to give more strength in tension.
An engineer would probably say it is over engineered but I prefer to err on the side of "over engineering" for my piece of mind.
The fibreglass bonnet had a right angle flange not a U shaped flange like a steel bonnet so the stop has to be higher to compensate.
What an unbelievable project. Fantastic finish !!
Every night before I go to sleep I wish that a car just like this would be in my garage when I wake up !
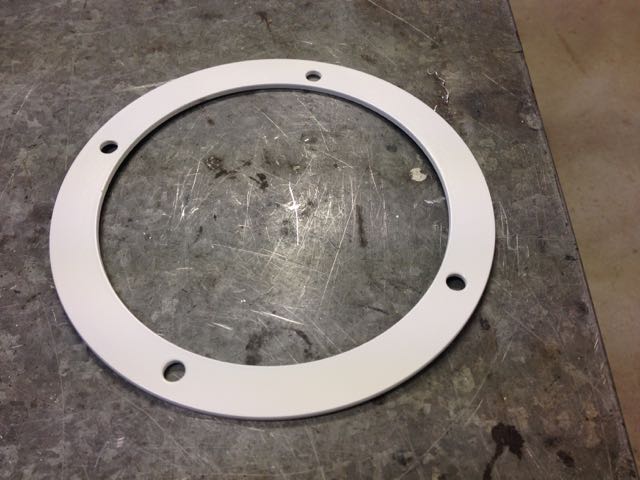
So the strut top spacer is mounted from below?
Being safe is important but heavy load will travel to the weakest point so if the have a strut top that can handle 10t plus (FYI one M8 4.6 can take 1.6kN (say1500 kg) ultimate tension ) then something else will give or bend and break. not saying the strut top needs to be a week point its best to have the less critical points weaker so it will fail before the harder to fix and more expensive bits fail.
V8 supercars for example put a weak point on there steering arms if then get a hit the arm fails and bends before transferring the load into the rack or hub.
Thanks. It has had a lot of interest where I live because there is nothing like it locally.
Yes the spacer is mounted from below. You were probably were confused by the trim ring I have on top to tidy up where I enlarged the hole in the wing with a jigsaw.
Thanks for the info, I suspected you would know more about the engineering of this than me. As I said before I have over engineered this and some other things on the car as well but I would rather do this ( which does increase the overall weight) than be worrying that something may fail. Maybe if I get brave enough I will remove some of the bolts from the top mount.
Great build, thanks for sharing.
Two quick questions about the master cylinder change, did switching the master cylinder make much difference to the pedal travel?
And did you notice much of a drop-off in front brake pressure because of it?
The reason i ask is that my pedal travel is very long, but the brakes bite great, and "feel" great, but id like shorter pedal travel. but not at the expense of "feel" or braking performance!
Thanks,
Alan.
Last edited by muckerbarry; 13-04-2015 at 12:03.
The pedal travel was reduced by about an inch, well that's what it felt like and has given me much more confidence in the brakes. I hate having a long pedal travel as I like that brakes to work " instantly".
I can't comment on the brake pressure because I didn't have the pressure sensors in place with the 0.625 master cylinder.
My advice bearing in mind I am no expert would be to change the master cylinder to see what happens.
Right, thanks, an inch is a lot alright. It would have been interesting to see did the master cylinder drop the pressure any from your sensors, its an handy tool to have in the car, (I never knew that such a system existed!) You know exactly what your brake bias is set at with it, rather than “3 turns of the bias-knob to the left and hope for the best”…. which is my current method of bias control when it rains!
However thinking about it since my previous post where I asked the question, I’m probably thinking about it the wrong way, what I mean is that there probably won’t be any drop in system pressure, instead ill have to push the pedal harder to achieve the same system pressure/braking force, or so I guess….
Ill change the master cylinder and see how i get on, thanks again.
I was concerned that changing to a 0.7 would mean that the pedal pressure would be too high and it would feel like pressing on a brick ( I have had this problem in previous cars which is why I started out with servos in this car) but I was surprised at how good the "feel" is.
I think it could be because I am using a Gartrac pedal box in this car whereas I have used other brands before.
Some escort you have built yourself lad
I have only found this build recently and I've spend the last few weeks reading it from top to bottom whenever I get the chance
you have put a lot of thought into it and only the very best stuff . Millington engine , sadev with paddles .... The stuff of dreams
your getting there where you get the brake pressure sensors
You are right about "the stuff of dreams". I have been dreaming about building an Escort like this for nearly 40 years but I never thought it would be this complex.
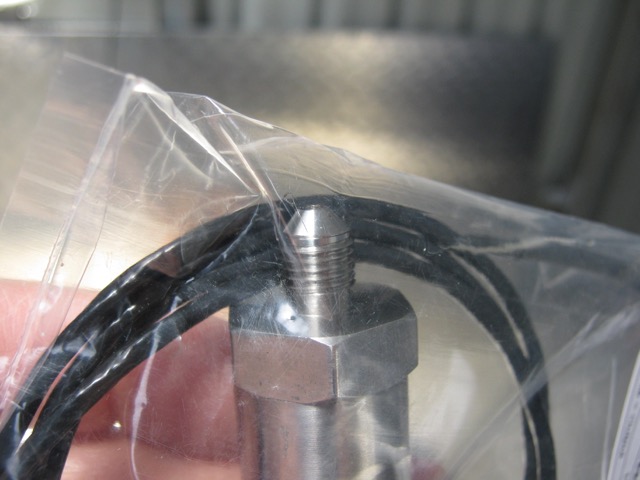
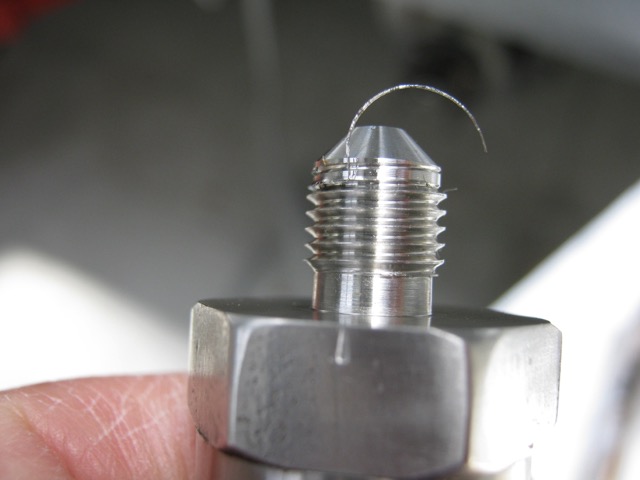
I got the brake pressure sensors from Race Technology
http://www.race-technology.com/conte...?pcat=2&cat=68
BUT I was very unhappy with them because the thread on each one was stripped as you can see from the photos... one as it was in the sealed bag marked "OK" !!!!
I emailed the photos to them asking for replacements but didn't have a reply and as I am in Australia I didn't take it any further.
I ran a die nut down the thread and was able to get them to screw into the T piece but I did use copper washer to seal them in the end.
I have just gone through this whole tread, and will describe it in one word
AaAWSOME
In my opinion you can't just use the brake pressure to know the balance between front an rear. You have to admit the diameter of the brake discs which is different on front and rear, the friction coefficent of your pads and the wheel diameter.
You might compare the absolute pressure but this is not the balance of your brake setup.
Lovely car, good idea to have bleed nipples on the brake fluid supply lines to the master cylinders, takes me ages to fill my cylinders due the small lines from the reservoirs.
Hows the car going Bevan?
Is it really two years since I last posted on this thread?
Yes it is and the reason is that my enthusiasm for cars and motorsport completely died but I now have it back
Just before last Christmas I put the car on my hoist and started to work on it to change some things and add some things. I will be posting the details of all these in the coming weeks.
I have completed 3 motorsport events and some practice days (one of which went very wrong which will be detailed later).
Anyway here is a taster of the new look front of the car and a video of my first competitive outing for two years. The video is a sprint that uses the tarmac stage from the Western Australian round of the Australian Rally Championship.
There was two sections: a Rallysprint (driver and co-driver) and Sprint ( driver only). I managed 2nd in the sprint and 4th in the combined Rallysprint/Sprint results.
https://www.youtube.com/watch?v=PA-e8L-bspA&t=4s ( I tried to embed the video but had no luck)
Last edited by genRS2000; 16-07-2017 at 11:17.
Looking forward to the updates and glad you're back into it
Wow
Id be putting that catch tank on the other side, breathers above the exhaust? thats asking for fire, as is using that type of clear hose above the exhaust, always amazes me how many people fit breather or dry sump tanks near an exhaust.
Great to have you back mate. Car still looks the nuts!
1970 Mk1 Escort Tarmac Rally Car
Nothing comes out the catch tank because the motor is sucking air in through the filters. All the fumes come out the oil tank in the boot.
The clear hose was only temporary. That was one of the things I needed to change.
Thanks Matt and Glen. I have got into the groove of driving it now and am getting good results as will be seen in later posts.
Last edited by genRS2000; 16-07-2017 at 15:11.
Does it need to be a tank then? could you not just have a breather hose with filter? lovely car btw!
dunno about down under, but a breather hose with a filter doesnt comply with MSA regulation
 Posting Permissions
 Reply With Quote
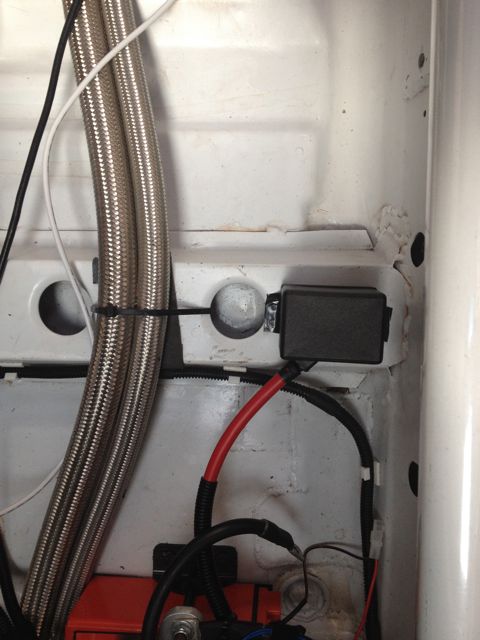


Bookmarks