


Great thread going on here! Keep at it

Great thread going on here! Keep at it
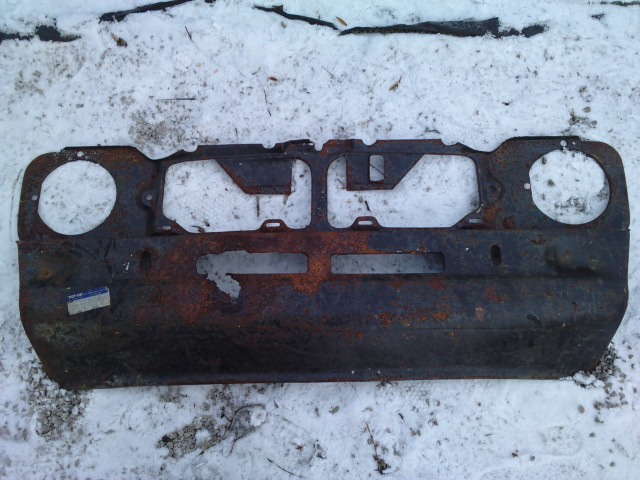
going to be a nice build.........nice garge too...i noticed the front top end were the light pods go got rotted........i have a full front end here you can have for free if you want it.....the catch is the bottom of it is rotten but the light top area is fine with a little surface rust....it was a new panel still with the label on it but condensation got to it in my gargage....free if you pay the post and i will slice it down from the top of the good bit...............kind regards nel
Hi Carl,
Great work on the shell so far
Looks like your shell, although some work is needed, is in a VERY good state.
Had a quick look at the welders and the 151TE has a better casing with a side access door rather than removing the casing and tougher front panel and easier power selector switch ,the only other difference is the color.
Keep up the good work as you are making very good progress with her
Regards
Kev
PS loads of good welding info here
Last edited by kev666; 03-12-2010 at 19:10.
Sorry for the late reply - just got back from watching Interpol at Manchester Apollo - fantastic stuff!!!
Thanks for the welder info Kev - I'll keep that in mind when I finally get round to making my purchase. BTW, I'd really love to see what an inner door post looks like, I believe you were picking one up from Expressed? I'm not sure if I really need one just yet, need to cut back the outer before I'll know for sure. BTW, I'm a Draughtsman, I recognised the traits you were showing on your thread.
Nel - I'm simply flabergasted by your generosity! I love Turbosport for incidents like this. Your front panel is rusted in the only place that mine is solid, so that's good. The trouble is I'm a couple of months away from any cutting and welding. Are you in a rush to create some space in your garage? I'm thinking that it will be springtime before I need any panels.
I've not idea what the difference is between the 151TE and the 150TE. I've got the former and it's not a bad machine, I did most of my Escort with it.
Might be an idea to give MM a ring and ask them what the difference is.
The disadvantage with these welders is the ampage control isn't as finely adjustable as the models with a rotary dial, and the torch and lead aren't particularly brilliant either when compared to the euro torches on pro migs. They can only take 5kg wire reels which are more expensive then the 15kg reels the pro migs use.
I did eventually get fed up with my Clarke and kept an eye on ebay for a good pro mig, one eventually turned up within 15 miles and I got it for £300 with a nearly full bottle of argoshield, two full reels of wire and a spare torch.
http://escort.accelerator.org
1968 MK1 Escort 1300GT
1969 'Big Wing' MK1 Escort
1972 MK3 Cortina 1600XL
1984 Sierra XR4i
And other junk I don't like to talk about!
thread us when your ready carl its only in the roof of my garage........will keep it on ice for you....will cut it and preserve in wax oil......nel
Last edited by helinelly; 04-12-2010 at 11:14.
As exboyracer said I would go for a better model with a eurotorch and use argonshield light gas,got fed up with the clarke one and the small gas bottles.Itll be worth saving up for a better model if its a few months off.Originally Posted by exboyracer
If you are not too far away you can borrow my small clarke welder 135 and have a practice/play which is what i did practiced on old scraps until you get the hang of it.let us know if you want too.
Hi Carl,I will drop some pics of the panels on my thread when i get them. Should pick them up on the 15thThanks for the welder info Kev - I'll keep that in mind when I finally get round to making my purchase. BTW, I'd really love to see what an inner door post looks like, I believe you were picking one up from Expressed? I'm not sure if I really need one just yet, need to cut back the outer before I'll know for sure. BTW, I'm a Draughtsman, I recognised the traits you were showing on your thread.
The only thing that I can say about buying a second hand welder is BE CAREFULL!! unless you know the seller that is. I am always weary of buying second hand migs as they can be basically scrap. If there is a lot of burning to the coil then it will cut out all the time. This tends to happen if the mig has been used a lot on high settings and has been tripped out a lot due to overheating.
Obviously things like torches etc can be changed.
I have been doing a fair amount of reading on the welding forum i posted a link too as it has some VERY good info on there. I have a mig, although VERY old, not sure if it is still operational though??
Will be checking that out this weekend. One thing I need to sort is the gas. I have 2 large bottles, although it is pub gas. The weld this gives isn't great to be honest. I will have to sign up to a supply of gas from a local BOC supplier. Well worth the extra cash to be honest.
Haven't touched my car for 2 weeks now as my commute to work is needing a lot of attention. Doing my head in as I feel like I am getting withdrawal symptoms from not going in the garage lol
Regards
Kev
Many happy returns Carl, hope you have a great day
Regards
Kev
comeing on well there m8 with ur car
keep up the good work.
D S RESTO S
Cheers guys, a year older but feeling more like 20 years older with this scraping malarkey. Getting sick of it now, good job I'm on the final 25%. I've finally finished the tunnel (well, enough for now anyway - may return to the little bits later). I've just got the driver's side to do now, all outboard of the chassis. Another 4 weeks should see me done I hope!!!
IMG_8560 by carlf18, on Flickr
NIce work mate keep it up
WOW carl!!! That underside looks nice nowwish mine looked as good as yours does.
I hate that under seal yellow rubbery stuff, if you get it too hot and it starts to smoke it really does stink!!
All the best for the New Year bud
Regards
Kev
Thanks guys.
Since nobody has told me to stop posting because they're completely bored of this.....
What a bee-atch of a job removing all of the gunge from under the rear seat. From this:
IMG_8676 by carlf18, on Flickr
To this...
IMG_8627 by carlf18, on Flickr
Just a layer of thick paint and primer to remove to reveal the gloss black below.
Then there's the front floor pans. After I stripped the car I more or less poured rust convertor in there to hide the orange coloured floor:
IMG_8612 by carlf18, on Flickr
Fearing the worst I began a little exploratory scraping tonight and was relieved to reveal at least 50% solid metal. Hopefully I won't have to replace the whole front floor, might get away with the odd patch here and there...
IMG_8624 by carlf18, on Flickr
I'll keep plodding on!
That looks cracking bud well done
read every update you do, so keep the piccies coming
www.gulfpetrolheads.com
cracking job so far
Good to see you havnt given up carl!!
its looking pretty dammed good
Looking good there,keep the pics coming.
I've been following this post for a while now and what a great job your doing, keep up the great work.
Keep it going mate its great to follow it through.
Nothing worse than an interesting thread just stopping.
Good luck to yer
Coming along nicely there carl. Keep the pics coming as it keeps me goin. Havent done anything on mine for a couple of weeks but your thread gives me a kick up the arse!!!!!
Regards
Kev
Thanks very much guys, knowing you are still interested keeps me going. I'd love to report more interesting progress and I'm itching to get started proper, but funds will be extremely tight for another 3 or 4 months yet. I need to buy some thin slitting disks, a roll of wire, an auto-tint mask and set up an account for some decent gas. So unless I find £200 down the back of the sofa I'll be taking my time uncovering more steel.
Carl, I am currently doing a college welding course which gives us access to cheaper autotint welding masks, (£35)
and they are really good, i have had mine for 2.5 years now.
PM me when your after one and sure we can sort something out.
Chuck norris HAS counted to infinity.... Twice
This is what makes TS a special place. You're very kind bud. I was thinking of something like this...
Auto Tint Helmet Link
Is yours similar to this? The postage might kill the idea on getting one from Worthing, dunno? I'll PM you when I find some pennies and we'll look into it. Thanks mate!
I've been concentrating on getting all the sound deadening off the tunnel this week. Driver's side is looking good...
IMG_8638 by carlf18, on Flickr
Still got the passenger side to do. This side has a few more traces of rust where the tunnel meets the bulkhead. I shall uncover more over the coming week.
IMG_8635 by carlf18, on Flickr
That's the exact helmet lol i will double check i think i can get them 4 £35 maybe cheaper. I expect with the postage it may throw it out the window but pm me when yr after it as I can always just whack it on the work courier for free. Car is looking great mate keep up the good work, I have been watching this threads from the start
Chuck norris HAS counted to infinity.... Twice
just finished reading up on this one, and what a nice car to start work onvery good nick, dont worry yourself about the welding, you said you've done it before about 20 odd years ago but its like ridding a bike, you dont really forget, the struggle is going to get used to the welder and type of metal your'll be welding, but just do what you've been doing and take your time and it will look spot on in the end
keep up the good work.
its not dead till it's buried!
T.I.T engineering. "Feel the power!"
Been busy easing off all the sound deadening panels and the seam sealer from the joints. Then rubbing back with T-Cut to reveal the original paint, so much so that my fingers are in pain! Decided to have a change of scenery and changed the 16A plug for a 13A plug on my MIG and fire it up for the first time (to make sure it actually works!). Still not welded with it but at least I know it fires up. Anyway, latest pic of the car in its present state...
IMG_8646 by carlf18, on Flickr
I love your dedication Carl, that wee 'scort is lookin well. Wish I had progress on mine! Keep at it matey!
Well done Carl, I like your approach, clean it all back and see what you've got. And it looks like what you've got is really good
Thanks for the encouragement chaps.
Some interior shots for you...
IMG_8696a by carlf18, on Flickr
IMG_8694a by carlf18, on Flickr
I'm currently spending hours cleaning up the inner wings and the engine bay in general. This is the drivers side as it stands at the moment (after 20 minutes work then I got bored).
IMG_8708a by carlf18, on Flickr
The passenger side was the same but I persevered a little more, just the awkward bit under the battery tray to sort out. (it's going to have to come off me thinks)
IMG_8704a by carlf18, on Flickr
Looking good bud keep up the good work
Carl, any updates on this? I reckon you reached the phase where you can get the grinder out?
Thanks for your interest Ruudje, I'm still persevering! Engine bay is pretty much stripped back, I'm now in the boot (literally) and fast running out of stuff to scrape off. I'm still looking at 3 or 4 months before I have the cash to buy the equipment I need to finally start cutting out and welding in some fresh stuff. I'm trying to borrow a camera so that I can update this thread properly, hopefully should have one soon.
Looks good bud dont think that sould take long to get soild again
Hi Carl,
Some real hard work going in there Mate.............I did the same to the underside of mine and it just takes hours and hours but the upside is all there to see..........she looks very solid.
Really enjoying the updates - keep going as the first phase is almost complete
Thanks chaps. Going to be a bit slow with the stripping back for a few days. As I said, I've been concentrating on getting the boot scraped. This past weekend I've whacked my head on the boot brackets far too many times so I thought I'd take them off. I tried to un-tension the rods by putting a ring ended spanner over the end and easing it off the notch thingy. It came off but the rapid release of resistance meant my hand flew against a nice sharp edge of metal. Should have had stitches really but a plaster will have to do (don't really fancy going to Tameside hospital with its reputation of killing people!). Anyhoo, here's a couple of pics of the driver's inner wing before and after just to prove I'm not slacking:
IMG_8731a by carlf18, on Flickr
Wow ,,,, just love seein these updates on all your hard work that most of us would normally just blast , dip or wire brush the stuff off
Keep them comin
 Posting Permissions
 Reply With Quote


Bookmarks