User Tag List

+ Reply to Thread
Page 1 of 2 1 2 LastLast
Results 1 to 40 of 66

Thread: TVR Chimaera build

  1. #1
    Racer luz008's Avatar

    Join Date
    Oct 2005
    Location
    Eastwood, Notts
    Age
    39
    Posts
    1,602
    Thanks
    2
    Thanked 8 Times in 8 Posts

    TVR Chimaera build

    Hey all

    It's been a long time since i've been on here due to being so busy working on my house and general work.
    But I thought i'd put a post up because I know how much you all love pictures and it's turning into a massive project which originally I didn't plan, oh well it's always the case. I should have bought a car that worked properly in the first place (Dads voice ringing around in the back of my mind).
    I bought 'Florence' back end of last year after some health issues were resolved I wanted a fun toy car to cheer me up. I went looking at XK8s (too old manish), Lotus' (too small inside), BMW 640i (nice car) and a few TVRs. I fell in love with the Chimaera, the looks, V8 rumble, decent amount of space in boot and behind the seats and just how comfortable they were.
    I was looking originally at the 400 (4 litre) but felt it wasn't fast enough as afterall it was a second car purely for fun, the 450 and 500 models were getting a bit pricey. Then I found an early 400 model that had a 4.6 engine fitted. I drove up to Edinborough and drove her home, 4 hour drive only one stop, no discomfort at all even with the suspension being set to rock hard.
    I've had some pretty powerful cars in the past, but nothing like this, especially having the power available in any gear at any revs. The noise is incredible and pops/bangs on overrun are amazing. It might not be everyones cup of tea, and everyone I know has said "why would you buy a TVR". Everyone assumes it will just break down everyday, and they are probably right. But it makes me smile like a little girl everytime I start her up.

    After a few months driving I thought I would start to fix some of the (many) things that needed doing.
    Spec of the car as I bought it is 4.6 crossbolted Range Rover v8 with wildcat heads, not sure on cams. ecu from a 5ltr, body off chassis restoration couple years ago, gaz shocks, big brake upgrade on front,. TVR OZ split rims toyo t1r tyres.

    Problems so far
    Dials - basically all of them Speedo is quite a bit out, rev counter sticky, fuel gauges doesn't work at all, temp/pressure gauges aren't reliable. Lights dont work.
    veneer on dash cracked/knackered
    Stereo wired so badly, no radio reception, crackles when going over a bump and has a funny interference noise that mimics the revs.
    wheels need a refurb
    there is an unbelievable amount of heat in the cabin, I can't drive with the roof on without windows down it's too hot, literally makes you sweat like you've been for a run. roof needs replacing as the rear window is cracked and switching is coming away.
    Runs way too rich (5.0 chip so it's over fuelling loads i assume) which i'm guessing also adds to the heat?
    interior carpet is faded so badly.
    center exhaust section rattling and manifold blowing
    suspension too low and hard
    battery goes flat if left more than one day.
    seats are old, saggy, scratched, seat belts don’t work.

    So the project began.
    I’ve got a garage full of parts I’ve been buying for the project so it was time to get started.
    first issue was the blowing exhaust manifold, fixed by steel gaskets and ARP bolts. This was so difficult it is ridiculously hard to get the manifold bolts out. Once the manifolds were off I got the bottom bolt holes machined into slots so I could put the bolts in the head then just slot the manifold on top, best modification i've ever done and saved so much time. The exhaust manifolds are wrapped which I think I will remove as I think this is adding to the heat in the cabin? the wrap stops at the down pipe so the section going through the tunnel i'm guessing will be made hotter.

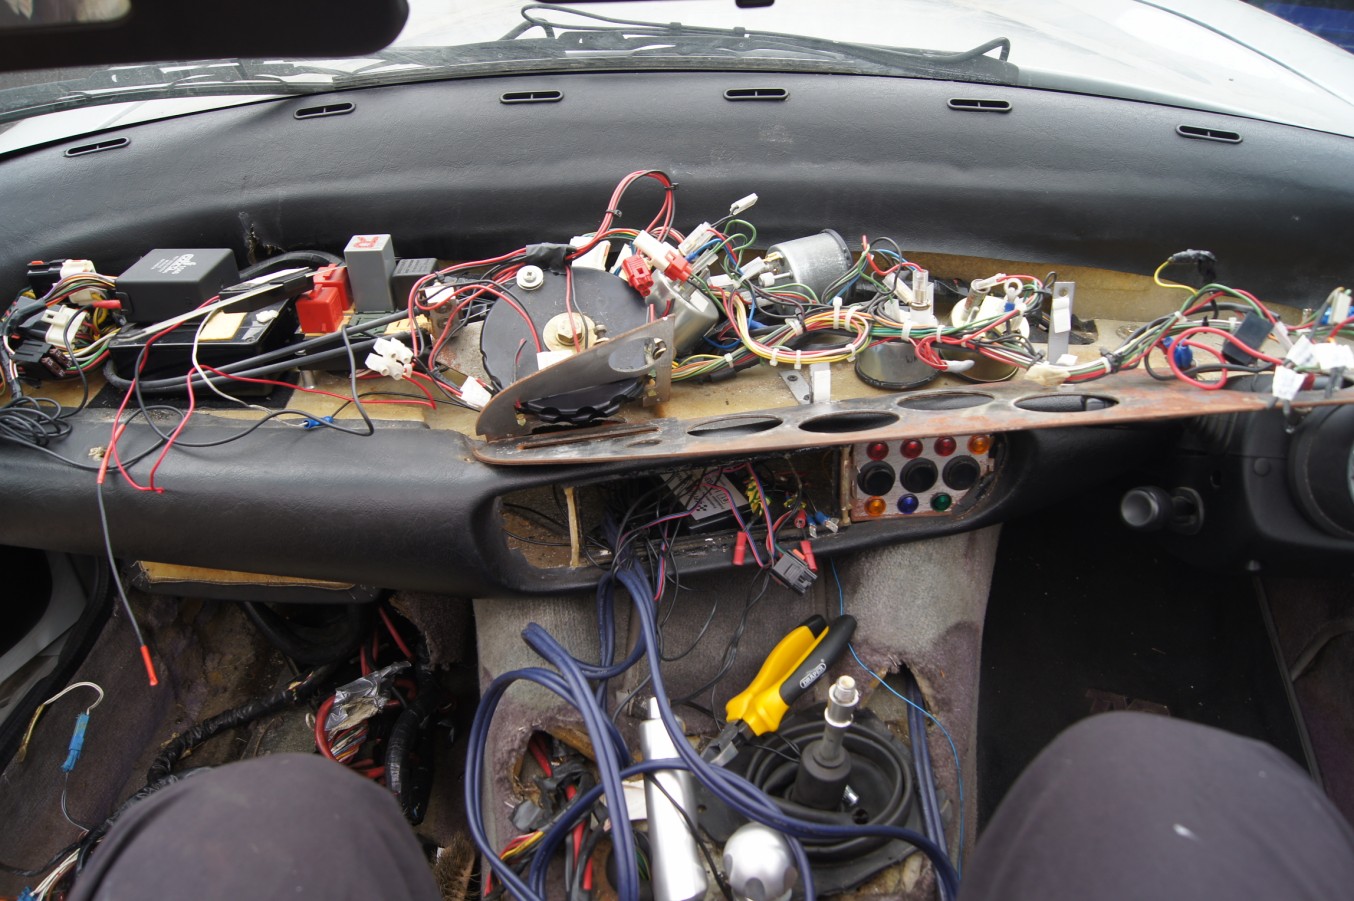
    I've stripped out the interior as I have new carpets, and Dynamatting everywhere. I am changing the colour of the leather from black to cream with a Furniture Clinic kit (has anyone else used this? it's great stuff). The wiring is such a joke, in fact the build quality of most of the car is a joke for how much these cost new, tiger seal and random bits of angle bracket everywhere. The battery wasn't fixed it, just floating about it the footwell with the ecu loose and the wiring loom shoved up behind the carpet.
    I found an unplugged wire which was the ECU tune resistor, no wonder it was running rich, this being disconnected means it’s always been running in limp home mode
    I'm moving the fuse board from footwell behind passenger seat and I’ve got an odyssey battery which I’m moving into the boot. Hopefully I can work out whats draining the batt and causing the alarm to constantly go off (maybe fuel pump relay)
    MX5 seats are going in, with speakers in headrests so no need for the 6x9s. seats will be changed to cream this weekend.
    Centre section of the exhaust is normally just a silencer box filled with wadding. This is being replaced by two cherry bomb type silencers, makes it not too loud but more aggressive than standard.
    I’ve ordered a new dash panel with extra gauge and it’s in swirled stainless steel, all new gauges and senders from ETB, they are chrome bezel with black face, LED alloy switches (savage ones). Also alloy stalks to get rid of the horrible Vauxhall plastic ones. Rewiring the stereo and putting a new amp behind driver seat to run the headrest speakers
    It’s an early Chimaera so the door locks are on the rear quarter panel and the mechanism doesn’t work. So I’m fitting switches to the underside of the wing mirrors like on the later models.
    When the near rear roof section is made I’m getting a much smaller rear window which lets it fold properly and lets it go further down. A good thing as you can’t see anything out the rear window when it’s down.

    Anyway, I’ve bored myself writing this so no doubt have everyone else, time for some pics.

    Brett


    Last edited by dangerousdave; 14-04-2012 at 00:40. Reason: Broken picture

  2. #2
    Part of the furniture Decade Plus User trig's Avatar

    My 1st Project
    Join Date
    Jul 2006
    Location
    bristol
    Age
    44
    Posts
    10,882
    Thanks
    892
    Thanked 209 Times in 200 Posts

    Re: TVR Chimaera build

    nice car ugly wheels sorry

  3. #3
    Racer luz008's Avatar

    Join Date
    Oct 2005
    Location
    Eastwood, Notts
    Age
    39
    Posts
    1,602
    Thanks
    2
    Thanked 8 Times in 8 Posts

    Re: TVR Chimaera build

    haha thanks Trig
    they looker nice when refurbed though, so the plan is to get them done, see how i feel about them and keep or sell them as they are quite rare apparantly

    Last edited by luz008; 13-04-2012 at 22:20.

  4. #4
    World Champion Decade Plus User Mk2Matt's Avatar

    My 1st Project
    Join Date
    Apr 2004
    Location
    Surrey
    Age
    37
    Posts
    4,130
    Thanks
    38
    Thanked 20 Times in 19 Posts

    Re: TVR Chimaera build

    Hi mate,

    You love a project don't you! I have to say I'm a big fan of the Chimaera and you can't beat a V8 rumble!

    Keep us posted

  5. #5
    Racer luz008's Avatar

    Join Date
    Oct 2005
    Location
    Eastwood, Notts
    Age
    39
    Posts
    1,602
    Thanks
    2
    Thanked 8 Times in 8 Posts

    Re: TVR Chimaera build

    haha yeah I think I have ADHD or something, I can't not have something to do. I hope this one doesn't take years, I've always wanted to Nurburg so I really aim for it this year

  6. #6
    tuk and poke me Decade Plus User mogsmex's Avatar

    My 1st Project
    Join Date
    Jul 2002
    Location
    essex, innit !
    Age
    51
    Posts
    2,763
    Thanks
    9
    Thanked 16 Times in 16 Posts

    Re: TVR Chimaera build

    Excellent write up very interesting project, I was looking at these last year as I fancied another roadster and I have fond memory's of a mates one, I wimped out in the end and got a Boxster s for a lot of the reasons you stated lol

    Love it though good luck and don't envy you the wiring !

    Ps, I love the wheels


    All I got for christmas was a sweater, I really wanted a moaner or a screamer......

  7. #7
    Racer luz008's Avatar

    Join Date
    Oct 2005
    Location
    Eastwood, Notts
    Age
    39
    Posts
    1,602
    Thanks
    2
    Thanked 8 Times in 8 Posts

    Re: TVR Chimaera build

    Had a full day today as finally we had some decent weather.
    Spent a few hours removing carpet, scraping off the burnt/stuck underlay which was a pain in the ass. Removed the battery tray which is just a fiberglass box bolted in the passenger footwell, with this removed it gives about 6 inch extra passenger leg room which will be a good improvement. THen started laying down some Dynamat extreme
    Changed some bits just as a precaution, more of a service thing. Two fuel pump relays and the heater control valve.
    Removed the lower dash panel ready to change it from black to cream next week along with the seats and various interior parts.
    Also spent ages checking/looking over the wiring trying to work out the mess.


  8. #8
    Pit Crew Decade Plus User raymondmarble's Avatar

    My 1st Project
    My 2nd Project
    Join Date
    Sep 2005
    Location
    Dundee
    Age
    49
    Posts
    1,029
    Thanks
    116
    Thanked 57 Times in 57 Posts

    Re: TVR Chimaera build

    Great project! I'm really enjoying this
    I'm guessing with all the work it needs, it was a bargain? If you can do it all yourself, thats a nice car you'll end up with for not a big outlay. Top stuff mate!
    Please 'Like' us on FB!
    https://www.facebook.com/pages/Jana-Kitchen-UK/393933930736835?ref=hl

  9. #9
    Racer luz008's Avatar

    Join Date
    Oct 2005
    Location
    Eastwood, Notts
    Age
    39
    Posts
    1,602
    Thanks
    2
    Thanked 8 Times in 8 Posts

    Re: TVR Chimaera build

    Thanks
    It wasn't that cheap but it wasn't expensive for the spec.
    Most of the stuff I'm doing is just for me really so it's the best it can be. I normally get carried away when I get into a project but never mind.
    It's had a chassis resto already and mechanically it's sound, the previous owner installed a 4.6 (it's so sweet) and was a few grand so I'm just freshening it all up really. Nothing too complicated yet but definitely save so much by doing it yourself. I like to try and do everything then if I get stuck I will try again, ha, I get it from my Dad and hate paying people to do anything. But when I get the megasquirt installed I'm guessing I'll have some problems and be asking for help all the time.

  10. The Following User Says Thank You to luz008 For This Useful Post:


  11. #10
    World Champion Decade Plus User exboyracer's Avatar

    Join Date
    Nov 2003
    Location
    Wirral UK
    Age
    50
    Posts
    6,740
    Thanks
    257
    Thanked 523 Times in 511 Posts

    Re: TVR Chimaera build

    Looks like an interesting project - I've never heard of a TVR yet which didn't turn into a money pit, so good luck with that
    http://escort.accelerator.org
    1968 MK1 Escort 1300GT
    1969 'Big Wing' MK1 Escort
    1972 MK3 Cortina 1600XL
    1984 Sierra XR4i
    And other junk I don't like to talk about!

  12. #11
    Racer luz008's Avatar

    Join Date
    Oct 2005
    Location
    Eastwood, Notts
    Age
    39
    Posts
    1,602
    Thanks
    2
    Thanked 8 Times in 8 Posts

    Re: TVR Chimaera build

    This weekends plans were screwed up with the weather, got some done though.
    Insulated and re-routed the heater pipes up in the passenger footwell.
    Made a mount for the ECU in good old TVR engineering style, which is a peice of wood stuck to the bulkhead that the ECU will screw into. not pretty but very functional and you can't see it. Better than the original setup which didn't fix the ECU at all, it was just plonked on top of the battery.
    I also started changing the interior colour over, starting with the seats which are from an MX5. I'm using a leather colour kit from furniture clinic and they are amazing. Sand, clean and prep the seats with alchohol and solvent solutions then sponge on a base coat in all the hard to reach places. Then spray on the colour a few coats, each dried with heat gun. Finally add a satin top coat to seal it


  13. #12
    Pit Crew Decade Plus User raymondmarble's Avatar

    My 1st Project
    My 2nd Project
    Join Date
    Sep 2005
    Location
    Dundee
    Age
    49
    Posts
    1,029
    Thanks
    116
    Thanked 57 Times in 57 Posts

    Re: TVR Chimaera build

    That looks fantastic!
    Please 'Like' us on FB!
    https://www.facebook.com/pages/Jana-Kitchen-UK/393933930736835?ref=hl

  14. #13
    Pole Position Decade Plus User M11rf's Avatar

    Join Date
    Apr 2004
    Location
    Bangkok, Thailand, Thailand
    Age
    45
    Posts
    4,346
    Thanks
    479
    Thanked 154 Times in 139 Posts

    Re: TVR Chimaera build

    The seat looks great now you have done it... Will be interesting to see how long it lasts tho.

    I am with Trig on the wheels... They look awful on the car!

  15. #14
    Racer luz008's Avatar

    Join Date
    Oct 2005
    Location
    Eastwood, Notts
    Age
    39
    Posts
    1,602
    Thanks
    2
    Thanked 8 Times in 8 Posts

    Re: TVR Chimaera build

    Thanks mate, the seats are sealed top coat with the same sort of finish from new so it should last years

  16. #15
    World Champion Decade Plus User caprimentle's Avatar

    My 1st Project
    Join Date
    Nov 2009
    Location
    essex
    Posts
    6,623
    Thanks
    338
    Thanked 242 Times in 232 Posts

    Re: TVR Chimaera build

    i love a v8 tvr, as long as the engine runs you can forgive all the other faults when you hear it, looks like your storming along brilliantly mate, keep up the good work, and i love them wheels aswell
    its not dead till it's buried!


    T.I.T engineering. "Feel the power!"

  17. #16
    Racer luz008's Avatar

    Join Date
    Oct 2005
    Location
    Eastwood, Notts
    Age
    39
    Posts
    1,602
    Thanks
    2
    Thanked 8 Times in 8 Posts

    Re: TVR Chimaera build

    Though i'd update what I'm up to in case anyone is in the mood for some more photos.

    Been on the car for last couple days when possible.
    removed fuel tank to enlarge the sender hole so I can fit the VDO sender. It's out, done and back in now but I will change the fuel lines and filer before finishing up.
    New speakers fitted in the MX5 headrests, they fitted spot on, 3.5" Ground Zero (50w rms), pair per headrest so should sound nice with a 6.5" I will be putting in the rear shelf/bulkhead. I wondered why the MX5 seats had 6 wires going into them, I thought maybe heated seats? But it turns out they have the optional 'thumper' which is inside the seat and vibrates to music. Kind of like a subwoofer effect but no audio comes out, just vibration, but I think it only works with the Maxda headunit so I will be ignorning it. I just thought it was an interesting idea from Mazda and haven't seen/heard of it before.

    Most of the interior is now underlayed with dynamat extreme for the important areas (footwells, bulkhead, tunnel, doors and rear shelf will be). Then using cheaper version for the floor, and any other areas that I'm doing.

    Fusebox moved behind passenger seat, original wiring loom stretched out fine then i've taped it to the tunnel nice and flat. I had to hacksaw the lip from the top of the cubby hole so the fusebox is now about a perfect fit. Battery box sorted for the boot, it will be going in the left hand corner to hopefully balance out the weight from the spare wheel. Earth is the chassis bolt behind fuel tank, crimped and soldered connections.

    Removed the exhaust so I can fit cherry bombs and change all the mounts, it was doing my head in and kept vibrating/rattling. When I took it off all the rubbers where perished and the previous owner tried to sleeve or do something to the backbox as it's been welded back on a bit rough, I'll sort that next week.

    Tomorrow I'm going to start carpeting and also play about with getting solendoids working for door releases. I've planned out a nify system using bike cables and remotely mounted solendoids, in theory it should work, but maybe not?


    Last edited by luz008; 06-05-2012 at 20:50.

  18. #17
    World Champion Decade Plus User Mk2Matt's Avatar

    My 1st Project
    Join Date
    Apr 2004
    Location
    Surrey
    Age
    37
    Posts
    4,130
    Thanks
    38
    Thanked 20 Times in 19 Posts

    Re: TVR Chimaera build

    All good progress there Keep it up.

  19. #18
    Racer luz008's Avatar

    Join Date
    Oct 2005
    Location
    Eastwood, Notts
    Age
    39
    Posts
    1,602
    Thanks
    2
    Thanked 8 Times in 8 Posts

    Re: TVR Chimaera build

    been working on her quite a bit although doesn't seem to be making much progress.
    the original gauges are a weird size (about 64mm and 104mm) and i've got all new ones which are standard 52mm and 100mm. I had planned on modifying the original dash with some metal cut out and stuck behind to narrow the holes. Didn't work out how I wanted so I've had one drawn in CAD and getting it laser cut instead. Trial fitted the gauges though and happy with them on the carbon effect Ni-loc 3m stuff, untill i have the cash for a proper carbon fibre dash.
    Also changed all the fluids which was fun
    Bought some Azevs while i'm refurbing the original wheels, I think i'll keep them though I like them that much


  20. #19
    Pit Crew Hoogi's Avatar

    Join Date
    Jul 2008
    Location
    Lancashire
    Age
    57
    Posts
    1,590
    Thanks
    50
    Thanked 89 Times in 87 Posts

    Re: TVR Chimaera build

    Interesting...............

  21. #20
    Racer luz008's Avatar

    Join Date
    Oct 2005
    Location
    Eastwood, Notts
    Age
    39
    Posts
    1,602
    Thanks
    2
    Thanked 8 Times in 8 Posts

    Re: TVR Chimaera build

    Todays been a good day on Florence, haven't been many of them so far.
    Changed diff oil which was much easier than expected, filled via a hose that i ran out the OSR wheel arch and just poured in oil until it started dripping out of the fill hole.
    Adjusted handbrake slightly, it still only really works when the brakes are pressed, oh well just a little TVR quirk I suppose.
    Fitted the amp on the back of the spare wheel which is a nice snug fit, cut a piece of mdf to fit the inside of the wheel, amp screwed to the mdf then it all attached to the wheel with nice ratchet strap. Sounds dodgy BUT very secure, easy to remove, weight of spare wheel and amp is about the same as the battery on the other side so it's evened out plus the amp and cabling are hidden away so the boot looks completly standard and the roof fits in perfect.

    If anyone has seen Zombieland you'll know rule #32 in life is enjoy the little things. I changed the key over to a flip fob and also got a new alarm fob, for some reason this is the best thing i've done. Can't really explain that but it made me happy. The flip fob has 3 buttons which open both doors and the boot, but only work when the alarm is deactivated so I need both fobs.


    the exhaust had an annoying rattle which turned out to be perished rubbers all round so changed all these at the same time as fitting cherry bombs. middle section cut open with exhaust on a jig so it remained straight, cherry bombs welded in place then 'box' welded back on, no pics of this unfortunately but the finished item looks like this


    Time to start after all this work, it's the first large engine car i've had and the quantities of things are surprising. 6 litres of oil and 12 litres of coolant. When I reconnected the battery the heater fan started working - weird! It never worked before and I haven't done anything to it, well not on purpose anyway. She started first time, let her warm up fully and blipped the throttle a little bit, made all the trouble worth while.

    video and little pic


  22. #21
    Spanner Monkey gwxe's Avatar

    Join Date
    Aug 2009
    Location
    esex
    Age
    59
    Posts
    228
    Thanks
    0
    Thanked 5 Times in 5 Posts

    Re: TVR Chimaera build

    Interesting thread this, cant wait to see it all finished.
    Must say TVR could benefit from employing someone like you to sort out all their little problems.
    Mate of mine bought a Griffiths and had simular problems, car looked and sounded great but had loads of niggly faults, mainly wiring.
    As for the wheels i think it looks alright with the Azevs but personaly speaking you can't beat a set of cross wire split rims, just a shame they are'nt a little deeper dished.
    Keep up the good work though fella its getting there.

  23. #22
    World Champion Decade Plus User exboyracer's Avatar

    Join Date
    Nov 2003
    Location
    Wirral UK
    Age
    50
    Posts
    6,740
    Thanks
    257
    Thanked 523 Times in 511 Posts

    Re: TVR Chimaera build

    Looks good now, fingers crossed on the reliability front!
    http://escort.accelerator.org
    1968 MK1 Escort 1300GT
    1969 'Big Wing' MK1 Escort
    1972 MK3 Cortina 1600XL
    1984 Sierra XR4i
    And other junk I don't like to talk about!

  24. #23
    Racer luz008's Avatar

    Join Date
    Oct 2005
    Location
    Eastwood, Notts
    Age
    39
    Posts
    1,602
    Thanks
    2
    Thanked 8 Times in 8 Posts

    Re: TVR Chimaera build

    not much been happening recently on Florence as i've been away in Vegas and then when i got back weather has been shite. Had a stinking hangover today so only managed to get a bit done.
    Took the grille off to spray black, sanded down flat and sprayed with black hammerite. While it was off I thought I may as well 'recharge' the air filter. I would recommend anyone doing this now, I was so surprised how much crap came out of it, so dirty and loads of dead flies etc. Recharge is easy, spray loads of the cleaning solution on the filter, leave for 10mins then rinse with hosepipe. When it's dry spray the oil all over.


    Got the dash and radio panelss knocked up in Autocad then had them laser cut. Moved hazard light switch next to clocks on right hand side, switch on radio panel will be for the fan. The holes for the gauges are too bloody big as he must have used the original hole size, not 52mm like i wanted - crap! will work that out tomorrow, i think i'll just stick a bit of metal behind the new dash front with correct hole sizes.
    There will be a TVR logo stuck onto the radio panel under the fan switch, it looks nice but didn't have tie to secure it today. Also the warning light strip needs adjusting level.
    Wiring is taking a lot longer than expected, but it's a bit complicated and I like to solder everything so it takes it's time. The switches in built LEDS are really bright so I've made them dimmable and will be fitting capacitors to the 12v feed so they fade off Thought it would make a nice touch with all the switches and gauge lights fading off. I just need to work out which ones to use, trial and error will fix that. The switches in the pics below have the LEDS quite bright, but they are always illuminated (low) and then when the switch is on they light up brighter.


    I couldnt work out where to stick the amp so I thought why not use the space behind the spare wheel? Screwed the amp to a peice of MDF then strapped onto the spare wheel, very secure and keeps it out the way. It was a temp place, but I can't think of any reason not to leave it there? Just need to get all the wiring finished now.
    Fitted relays and the remote door opening onto the MDF rear bulkhead thing. As everything will be covered by the trim I didn't take too much time making it all neat, but wiring all works and soldered everything. I will be fitting the fire extinguiher ontop of the fuel tank next to the sub I think? I was in two minds about getting one, but with a few friends cars having fires I thought so it. About £100 for a proper plumbed in one and it gives me peice of mind.


    Also doing some trial and error on the LEDs for gauges to see which give the best illumination


    [footnote]Edited by brett84 on Saturday 23 June 20:05[/footnote]

    [footnote]Edited by brett84 on Saturday 23 June 20:12[/footnote]

  25. #24
    Spanner Monkey Turbosport Subscriber

    My 1st Project
    My 2nd Project
    Join Date
    Jan 2010
    Location
    Watford
    Age
    30
    Posts
    328
    Thanks
    44
    Thanked 19 Times in 18 Posts

    Re: TVR Chimaera build

    Some top quality work there!

    one thing about the amp - your covering up the 'heat sinks' on the amp with the ratchet straps and ive managed to overheat my amp doing something like that because i wanted my amp hidden

    cheers Scott

  26. #25
    World Champion Decade Plus User exboyracer's Avatar

    Join Date
    Nov 2003
    Location
    Wirral UK
    Age
    50
    Posts
    6,740
    Thanks
    257
    Thanked 523 Times in 511 Posts

    Re: TVR Chimaera build

    Dash looks miles better!
    http://escort.accelerator.org
    1968 MK1 Escort 1300GT
    1969 'Big Wing' MK1 Escort
    1972 MK3 Cortina 1600XL
    1984 Sierra XR4i
    And other junk I don't like to talk about!

  27. #26
    Pit Crew Decade Plus User raymondmarble's Avatar

    My 1st Project
    My 2nd Project
    Join Date
    Sep 2005
    Location
    Dundee
    Age
    49
    Posts
    1,029
    Thanks
    116
    Thanked 57 Times in 57 Posts

    Re: TVR Chimaera build

    The dash looks fantastic! Great result there. I like your Azev's too, they suit the silver paint on the car, looks good
    Please 'Like' us on FB!
    https://www.facebook.com/pages/Jana-Kitchen-UK/393933930736835?ref=hl

  28. #27
    I support TS Turbosport Subscriber sholdowa's Avatar

    Join Date
    Oct 2006
    Location
    Christchurch, New Zealand
    Age
    64
    Posts
    521
    Thanks
    35
    Thanked 15 Times in 15 Posts

    Re: TVR Chimaera build

    The 'factory' amp on my Griff was on a carpet covered board mounted at the back of the boot, rather than at the front, by the firewall.

  29. #28
    Bodger

    Join Date
    Mar 2007
    Location
    Hartwell
    Age
    55
    Posts
    166
    Thanks
    0
    Thanked 13 Times in 10 Posts

    Re: TVR Chimaera build

    Nice thread , yes TVR,s build quality is pants always has been , i use to look after a Chimera 4ltr then the chap got a Tuscan 2 he has now sold both , now my other friend has a mk1 Tuscan S , now thats a completely different animal , its now 7ltrs and @ 530-550 hp all in a 1100 lbs !!! respect is given every time i drive it ..... a few stats 0-100 6 sec 1/4 miles 10.67 @ 137 mph and with the new crown wheel and pinion it will do around 200 mph.

    Good luck with yours it will be worth it when its done , hers a few pics of the tuscan !


  30. #29
    Racer luz008's Avatar

    Join Date
    Oct 2005
    Location
    Eastwood, Notts
    Age
    39
    Posts
    1,602
    Thanks
    2
    Thanked 8 Times in 8 Posts

    Re: TVR Chimaera build

    Finally starting to point some parts back together again now, it's about time, just the centre console so far

  31. #30
    Spanner Monkey

    Join Date
    Aug 2005
    Location
    preston
    Age
    40
    Posts
    240
    Thanks
    17
    Thanked 6 Times in 6 Posts

    Re: TVR Chimaera build

    what a brilliant project mate, will be keeping an eye on this

  32. #31
    Racer luz008's Avatar

    Join Date
    Oct 2005
    Location
    Eastwood, Notts
    Age
    39
    Posts
    1,602
    Thanks
    2
    Thanked 8 Times in 8 Posts

    Re: TVR Chimaera build

    bloody weather this weekend slowed down the plans I had, never mind, a bit of British engineering in the form of a tesco finest gazebo with a car cover over the top for waterproofing. I think I should start marketing them as mobile Chimaera garages?


    managed to get the lower part of the dash fitted, I still need to cut in the drivers air vent. Battery mounted in the boot along with sub and fire extinguisher. I had hoped to plumb it in but it was raining too much. I think i'm going to mount the handle of it by the side of the seat, but i'll work that out when I finally get the seats in, one day....


    refitted the air filter and gave the grill some black paint, looks so much better with clear sidelights now, I forgot to fit the new union jack badge though


    Weather stayed crap so I tidied up the shed and made the dash, well covered it in the 3m carbon stuff. Looks better than I thought it would actually. The new panel I had laser cut had the wrong size holes for gauges, micommunication with the guy doing my cad drawing.


    A tech question if someone can help please. I have wired the radio panel LEDs in series with a resistor and capacitor so they are dim and fade off. Now the gauges I'm having trouble working out as they have a single earth (for bulb and gauge function). I had planned on going from a dimmer with a capactior then wiring in series so I can control the brightness. But I dont think I could do this with the earth being shared? Any ideas to get around? If I had to wire each gauge individually I won't have brightness control, if I had to then i'll do this, but I would rather have the dimmer. Plus I would have to fit a cap to each gauge to get the fade.

  33. #32
    Spanner Monkey the1theycallthe1's Avatar

    Join Date
    Jul 2007
    Location
    The Midlands
    Age
    36
    Posts
    305
    Thanks
    1
    Thanked 8 Times in 7 Posts

    Re: TVR Chimaera build

    Those gauges are lovely - where are they from?

  34. #33
    Racer luz008's Avatar

    Join Date
    Oct 2005
    Location
    Eastwood, Notts
    Age
    39
    Posts
    1,602
    Thanks
    2
    Thanked 8 Times in 8 Posts

    Re: TVR Chimaera build

    from ETB mate, really like them and they are cheaper than most places. Only took about 2 weeks to make. Normally you just have fuel, water and oil temp then a clock, I thought my combination would be a lot more useful
    http://www.etbinstruments.com/ETB_Range.htm

    Last edited by luz008; 01-07-2012 at 18:19.

  35. #34
    World Champion Decade Plus User exboyracer's Avatar

    Join Date
    Nov 2003
    Location
    Wirral UK
    Age
    50
    Posts
    6,740
    Thanks
    257
    Thanked 523 Times in 511 Posts

    Re: TVR Chimaera build

    Quote Originally Posted by luz008 View Post
    A tech question if someone can help please. I have wired the radio panel LEDs in series with a resistor and capacitor so they are dim and fade off. Now the gauges I'm having trouble working out as they have a single earth (for bulb and gauge function). I had planned on going from a dimmer with a capactior then wiring in series so I can control the brightness. But I dont think I could do this with the earth being shared? Any ideas to get around? If I had to wire each gauge individually I won't have brightness control, if I had to then i'll do this, but I would rather have the dimmer.
    The shared earth shouldn't matter, as for the purposes of your circuit this is just a 'drain' point. It is the positive supply to the gauge illumination that needs to ramp down slowly to provide the fade, so as long as this isn't shared with the positive supply to the gauge electronics it should work fine!
    http://escort.accelerator.org
    1968 MK1 Escort 1300GT
    1969 'Big Wing' MK1 Escort
    1972 MK3 Cortina 1600XL
    1984 Sierra XR4i
    And other junk I don't like to talk about!

  36. #35
    Racer luz008's Avatar

    Join Date
    Oct 2005
    Location
    Eastwood, Notts
    Age
    39
    Posts
    1,602
    Thanks
    2
    Thanked 8 Times in 8 Posts

    Re: TVR Chimaera build

    thanks mate, just had a chat with ETB also who said the same thing

  37. #36
    Racer luz008's Avatar

    Join Date
    Oct 2005
    Location
    Eastwood, Notts
    Age
    39
    Posts
    1,602
    Thanks
    2
    Thanked 8 Times in 8 Posts

    Re: TVR Chimaera build

    Due to the monsoon season I haven't been able to start putting things back together, I really need to get a garage.
    I got the dashboard wired up in the shed though, worked out how it's all going together as well so It should be easier putting it all back together.
    I wasn't sure on colours but not i've fitted blue LEDs they look nice and I will stick with that


    I was having trouble working out the wiring for the switches as it's quite a bit different from standard but it's going to be easier to just make most of the wiring new instead of using lots of the original loom.
    In case anyone is thinking of using these switches in the future the hazard switch (which i've moved next to the speedo) wiring is like this

    I'm using the Bright6 warning so there are left/right indicator LEDs

    The 3 light switches now have LEDs built in, so what were the lower 3 warning lights just wire into the switches which also use the original circuits.

    There is now a fan switch on the radio panel in the place where the hazard light used to be, there was originally a fan switch under the steering wheel which i've just moved the wiring for. The switch under the steering wheel now turns the amp on/off (switches the remote signal from the headunit).

  38. #37
    Racer luz008's Avatar

    Join Date
    Oct 2005
    Location
    Eastwood, Notts
    Age
    39
    Posts
    1,602
    Thanks
    2
    Thanked 8 Times in 8 Posts

    Re: TVR Chimaera build

    Had a long and frustrating day on the car again today.
    Bought some boot seal from eBay but the one i've bought is too large so the boot doesn't shut properly - DOH. I'll have to order some more.

    Got the dash fitted and all gauges wired in, and working, first time, which I was surprised by. It's wierd having a tacho which doesn't jump and I like having it on the left instead of the right.
    Fitted an LED in the steering column plastic trim, there are oil and ignition warning lights in the new bright6 module i'm using so I don't really know what to use the LEDs in the dash for now? Maybe I'll use one as a shift light as i'm going megasquirt shortly?

    I didn't like the plastic heater control so I got the metal ones from a later model from a breakers and fitted those. It took quite a while to swap the disks over but I think it looks a lot better. One of the LEDs in the 'discs' was dim, seems to be a fault? But i didn't notice this until i had already fitted them so i just stuck a resistor on the feed to the other so thats just as dim, it will look ok i think now anyway.

    I spent a couple hours trying to get the indicators working and still havnen't figured it out. It seems in fitting the hazard switch i've screwed up the circuit somehow? I'm going to try a straight ignition feed to the flasher and trace back or make new leads to the indicator stalk. So if I can't figure it out the new wiring will sort it.

  39. #38
    Racer luz008's Avatar

    Join Date
    Oct 2005
    Location
    Eastwood, Notts
    Age
    39
    Posts
    1,602
    Thanks
    2
    Thanked 8 Times in 8 Posts

    Re: TVR Chimaera build

    so where is she at now?
    All wiring finished finally, gauges all working and made a lights on warning buzzer (sidelights on, ignition off, doors open).
    Dash back together and drivers seat and new seat belt fitted. Originally the seats are just bolted through the floor with washers, I didn't like this idea so I've put alloy plates both sides and clamped through those.
    Wheel studs are originally 50mm but with the 10mm spacers there wasn't much thread left and I didn't fancy loosing a wheel so swapped these for 63mm ones. Nearly ready for MOT now, finally.....


  40. #39
    Pit Crew Decade Plus User

    Join Date
    Feb 2007
    Location
    Norway
    Age
    48
    Posts
    942
    Thanks
    58
    Thanked 19 Times in 18 Posts

    Re: TVR Chimaera build

    wow, looks really good
    67 TVR VIXEN V8

  41. #40
    Pit Crew boombang's Avatar

    Join Date
    Mar 2006
    Location
    Essex
    Age
    42
    Posts
    897
    Thanks
    6
    Thanked 9 Times in 8 Posts

    Re: TVR Chimaera build

    Massive improvement, good job!
    Quote Originally Posted by boombang View Post
    Not entirely sure what point I was first trying to make or even sure what point I have made.

+ Reply to Thread

Bookmarks

Posting Permissions

  • You may not post new threads
  • You may not post replies
  • You may not post attachments
  • You may not edit your posts